
In one of my previous blog posts I’ve talked about how we can make simple animations in Blend and shown how we can move stuff around in our interface. However, our animations would need to be a lot better than moving several elements around or spinning them in order to be visually appealing.
And one of the most widely used effects is, of course, flipping something onscreen like a card. This effect not only looks good, but also can be used as a nice transition animation between several elements in your page. And it is really easy to implement by using Blend. Here are the videos of the example app we will make (source code is at the bottom of the page :)):
My computer is a bit old, so it caused some stuttering when saving the videos. The animations are quite smooth in the app. 🙂
So, if this has grabbed your attention, read on and we will create the example app shown in the videos above.
As always, we’ll start with a blank Windows Store app project in Visual Studio.

We’ll make a card that flips when the user taps it, so download the following images which will be the front and back covers of the card, and add them to the project.


No copyright infringement intended Konami. Plz don’t sue me. 😦
We will be flipping our card by animating the Y Projection property of our user controls, which will rotate the card around the Y axis. This will make one face of our card rotate around itself, and at 90 degrees, it will be invisible (because it will have a width of 0 this way, since we’ll be looking directly at its side). At that point, we’ll start animating the Y Projection property of the other side of the card, from -90 degrees to 0, which will show the other side of the card, resulting in a complete flip effect.
If you want to flip it upside down, then you can animate the X Projection property. Or, animate both X and Y to flip it diagonally. 🙂
So, in MainPage.xaml, we’ll create a Grid that contains two Image controls; one for the front and one for the back. Note that the Image control that represents the front side of the card has a -90 value for its Y Projection property.
        <Grid x:Name="GridCard" HorizontalAlignment="Left" Height="378" Margin="100,100,0,0" VerticalAlignment="Top" Width="260" Tapped="GridCard_Tapped">
            <Image x:Name="ImageCard" Source="Red-Eyes-Darkness-Metal-Dragon.png">
                <Image.Projection>
                    <PlaneProjection RotationY="-90"/>
                </Image.Projection>
            </Image>
            <Image x:Name="ImageCover" Source="cardcover.png"/>
        </Grid>

Ok then, our next stop is Blend. Either open Blend and then open this project in it, or just right-click MainPage.xaml in Solution Explorer and select “Open in Blend”.

We will create a storyboard named FlipOpen, which will have a duration of 0.400 seconds and the following key frames:
– ImageCover (the back side) will have a keyframe with a Y Projection value of 0 at 0 seconds, and another key frame at 0.200 with a Y Projection value of 90.
– ImageCard (the front side) will have a keyframe with a Y Projection value of -90 at 0.200 seconds, and another key frame at 0.400 with a Y Projection value of 0.
(The seconds are not very important because you can change the SpeedRatio of the storyboard in the code. So you can make a 1 second animation and give a SpeedRatio of 2.5 to get the same results as above).


You can press the play button of the storyboard to check if it works correctly. 🙂 Now, we’ll need to be able to flip the card back down too. We can’t reverse the animation in the codebehind and play it backwards, so instead we’ll create another storyboard that is the exact same reverse of our FlipOpen storyboard. And don’t try to create it manually, because Blend allows us to do this automatically with just a few clicks.
Select FlipOpen storyboard, click the little down arrow next to the New Storyboard button, and select Duplicate. Rename the new storyboard to FlipClose, click the same down arrow again, and click Reverse.


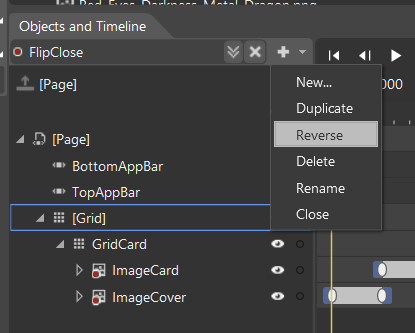
Note: If you try to play the reverse storyboard (FlipClose) in Blend, it will look weird. That is because you’ll be trying to flip down a card that is already flipped down. The animation will work correctly if you play it after the card has been flipped up, and we’ll ensure this in codebehind.
Ok then, the animation is ready. Save MainPage.xaml in Blend and switch back to Visual Studio (it will prompt you to reload the project, say yes).

If you look in MainPage.xaml, you’ll see that Blend has added the animations to the XAML code, which will look like this:
		<Storyboard x:Name="FlipOpen">
			<DoubleAnimationUsingKeyFrames Storyboard.TargetProperty="(UIElement.Projection).(PlaneProjection.RotationY)" Storyboard.TargetName="ImageCover">
				<EasingDoubleKeyFrame KeyTime="0" Value="0"/>
				<EasingDoubleKeyFrame KeyTime="0:0:0.2" Value="90"/>
			</DoubleAnimationUsingKeyFrames>
			<DoubleAnimationUsingKeyFrames Storyboard.TargetProperty="(UIElement.Projection).(PlaneProjection.RotationY)" Storyboard.TargetName="ImageCard">
				<EasingDoubleKeyFrame KeyTime="0:0:0.2" Value="-90"/>
				<EasingDoubleKeyFrame KeyTime="0:0:0.4" Value="0"/>
			</DoubleAnimationUsingKeyFrames>
		</Storyboard>
		<Storyboard x:Name="FlipClose">
			<DoubleAnimationUsingKeyFrames Storyboard.TargetProperty="(UIElement.Projection).(PlaneProjection.RotationY)" Storyboard.TargetName="ImageCover">
				<SplineDoubleKeyFrame KeyTime="0:0:0.2" Value="90"/>
				<SplineDoubleKeyFrame KeyTime="0:0:0.4" Value="0"/>
			</DoubleAnimationUsingKeyFrames>
			<DoubleAnimationUsingKeyFrames Storyboard.TargetProperty="(UIElement.Projection).(PlaneProjection.RotationY)" Storyboard.TargetName="ImageCard">
				<SplineDoubleKeyFrame KeyTime="0:0:0.2" Value="-90"/>
				<SplineDoubleKeyFrame KeyTime="0:0:0.4" Value="-90"/>
			</DoubleAnimationUsingKeyFrames>
		</Storyboard>
Now we just need to set the Tapped event of the Grid containing the images, in order to play the relevant animation when the card is touched. Keep in mind that you need to build the project in order to see the newly added storyboards in codebehind.
        bool cardOpen = false;

        public MainPage()
        {
            this.InitializeComponent();
        }

        private void GridCard_Tapped(object sender, TappedRoutedEventArgs e)
        {
            if (cardOpen == false)
            {
                FlipOpen.Begin();
                cardOpen = true;
            }
            else
            {
                FlipClose.Begin();
                cardOpen = false;
            }
        }
Alright then, let’s run the app and flip the card. 🙂


Looks good. 🙂
Now, I’m not going to create it step by step here, but you can apply this operation to any control you want, such as the Grid shown below, which flips to the next set of items the user has to fill (this is included in the example source code).


It’s quick to make, but can make a huge difference, don’t you think? 🙂
Now if only I could change the target elements of the storyboard at run time. That way, I could create only a few storyboards and use them in all elements I want. Would have been very useful if I were making a card game. 🙂
You can get the source code from here.
Thank you for reading, and see you in my other articles. 😉

This was an excellent tutorial – so nice and simple. Thanks!
Thank you very much, glad you liked it. 🙂
Hi,
Not sure if you’re still following this, but I liked your tutorial, so I’m gonna help you too. You mentioned about changing the target at runtime. Here’s one line of code which should do it:
Storyboard.SetTargetName(FlipOpen, “GridCard”);
This definitely works in WPF, not tested in Windows 8 🙂
Page curl yapmayı da anlatır mısın şütfen
Thanks, but your source code link is broken.
Thank you for pointing it out; I’ve updated it in the post. Here it is: https://1drv.ms/u/s!AsU4DCG2CyyuhWWB0PNC7LFltdqt
Thank you for this exceptionally concise lesson! I am programming a new card game – with little experience in animation – and to make sure that I am on the right path I searched for “flip” in Blend I luckily found this . Exactly what I was looking for!
I was so glad to find this tutorial. However now I found that in my VS Studio 2017 Community the functionality is a bit different, to say: poorer. The flip transformation has no X- or Y-angle that I can control. The object makes a 180 degree flip only. Also, in XAML the image I want to flip has no Projection-property. Is this funktionality available only in the Pro-Edition?