
Animations, when done properly, are a guaranteed way of increasing the visual appeal of an app. In my previous blog posts, we’ve seen how we can make simple animations in Blend, and later we’ve seen how we can combine these simple animations to make a card flip effect. So, contiuning on in this trend, I’ve set my eyes on the another such frequently used and nice-looking effect: Turning a page.
If you look at the card flip effect example, you can see that we can actually use it for turning a page by changing the center of rotation of the objects. However, this will result in stiff looking rectangle pages which lack the curvy edges of a real page. So, how can we turn that page more realistically?

Unfortunately, we can’t make it look as good as this. At least, not easily.
It is not possible to create an effect in Blend like shown in the screenshot. You can, however, create such an effect in code, using bezier curves and whatnot. But it looks quite complicated, and I’ve seen people suggesting to use Direct2D instead of creating such animations in code. Also, while searching, I’ve come across some code examples or custom user controls but they were generally for WPF (I’ve only found one custom control for WinRT, and it wasn’t free).
So our best bet would be animating curves in codebehind, or learning Direct2D. Unfortunately, ain’t nobody got time for that.
If you are muttering to yourself “But.. but, I just wanted to turn a simple page, nothing fancy!”, then you are at the right place. We can play around in Blend a little to make it “sort of” curvy and look just like shown in the video below:
In this article, we’ll create an example app which will have a book where the user can turn the pages with the animation shown above.
Ok then, let’s start by creating a blank Windows Store app project in Visual Studio.

Then, we’ll download the following images and add them to the project. They will be used as the pages and the cover of the book in the app.

Paper.

Cover.
Now, here’s the trick: To display the pages, we will not be using an Image control (which will look rectangular). Instead, we’ll use a Rectangle and set its corners to round to achieve the curvy look. We will stack several rectangles this way and set the rectangles in the back to be slighlty larger, so we will see several pages on top of each other (with the cover below). These rectangles will be just for show.
And here’s the second trick: To display the contents of the pages, we’ll have 4 grids (one for the shown page and one for below; for both sides). We need 4 of them to create the animation effectively. Each of these grids will include a Rectangle, plus a TextBlock that will be used to display the contents of the page. When flipping pages, we’ll juggle between the visibility of these grids to provide the page turning animation successfully. We also add two buttons to turn to the next and previous pages.
So it will look like the following in MainPage.xaml:
    <Grid Background="{StaticResource ApplicationPageBackgroundThemeBrush}">
        <Rectangle HorizontalAlignment="Left" Margin="82,118,0,0" Stroke="Black" Width="421" Height="564" VerticalAlignment="Top" RadiusX="5" RadiusY="10">
            <Rectangle.Fill>
                <ImageBrush ImageSource="cover.jpg"/>
            </Rectangle.Fill>
        </Rectangle>
        <Rectangle HorizontalAlignment="Left" Margin="88,112,0,0" Stroke="Black" Width="415" Height="568" VerticalAlignment="Top" RadiusX="150" RadiusY="20">
            <Rectangle.Fill>
                <ImageBrush ImageSource="paper.jpg"/>
            </Rectangle.Fill>
        </Rectangle>
        <Rectangle HorizontalAlignment="Left" Margin="92,108,0,0" Stroke="Black" Width="411" Height="568" VerticalAlignment="Top" RadiusX="150" RadiusY="20">
            <Rectangle.Fill>
                <ImageBrush ImageSource="paper.jpg"/>
            </Rectangle.Fill>
        </Rectangle>
        <Rectangle HorizontalAlignment="Left" Margin="96,104,0,0" Stroke="Black" Width="407" Height="568" VerticalAlignment="Top" RadiusX="150" RadiusY="20">
            <Rectangle.Fill>
                <ImageBrush ImageSource="paper.jpg"/>
            </Rectangle.Fill>
        </Rectangle>
        <Rectangle HorizontalAlignment="Left" Margin="503,118,0,0" Stroke="Black" Width="421" Height="564" VerticalAlignment="Top" RadiusX="5" RadiusY="10">
            <Rectangle.Projection>
                <PlaneProjection RotationY="180"/>
            </Rectangle.Projection>
            <Rectangle.Fill>
                <ImageBrush ImageSource="cover.jpg"/>
            </Rectangle.Fill>
        </Rectangle>
        <Rectangle HorizontalAlignment="Left" Margin="505,112,0,0" Stroke="Black" Width="415" Height="568" VerticalAlignment="Top" RadiusX="150" RadiusY="20">
            <Rectangle.Projection>
                <PlaneProjection RotationY="180"/>
            </Rectangle.Projection>
            <Rectangle.Fill>
                <ImageBrush ImageSource="paper.jpg"/>
            </Rectangle.Fill>
        </Rectangle>
        <Rectangle HorizontalAlignment="Left" Margin="505,108,0,0" Stroke="Black" Width="411" Height="568" VerticalAlignment="Top" RadiusX="150" RadiusY="20">
            <Rectangle.Projection>
                <PlaneProjection RotationY="180"/>
            </Rectangle.Projection>
            <Rectangle.Fill>
                <ImageBrush ImageSource="paper.jpg"/>
            </Rectangle.Fill>
        </Rectangle>
        <Rectangle HorizontalAlignment="Left" Margin="505,104,0,0" Stroke="Black" Width="407" Height="568" VerticalAlignment="Top" RadiusX="150" RadiusY="20">
            <Rectangle.Projection>
                <PlaneProjection RotationY="180"/>
            </Rectangle.Projection>
            <Rectangle.Fill>
                <ImageBrush ImageSource="paper.jpg"/>
            </Rectangle.Fill>
        </Rectangle>
        <Grid x:Name="GridLeftBelow" Margin="100,100,0,0" HorizontalAlignment="Left" Width="403" Height="568" VerticalAlignment="Top">
            <Grid.Projection>
                <PlaneProjection CenterOfRotationX="1"/>
            </Grid.Projection>
            <Rectangle HorizontalAlignment="Left" Stroke="Black" Width="403" Height="568" VerticalAlignment="Top" RadiusX="150" RadiusY="20">
                <Rectangle.Fill>
                    <ImageBrush ImageSource="paper.jpg"/>
                </Rectangle.Fill>
            </Rectangle>
            <TextBlock x:Name="TextBlockLeftBelow" FontSize="18" Foreground="Black" Margin="30,40,30,30" TextWrapping="Wrap" FontFamily="Baskerville Old Face"/>
        </Grid>
        <Grid x:Name="GridRightBelow" Margin="505,100,0,0" Height="568" VerticalAlignment="Top" HorizontalAlignment="Left" Width="403">
            <Grid.Projection>
                <PlaneProjection CenterOfRotationX="0"/>
            </Grid.Projection>
            <Rectangle HorizontalAlignment="Left" Stroke="Black" Width="403" Height="568" VerticalAlignment="Top" RadiusX="150" RadiusY="20">
                <Rectangle.Projection>
                    <PlaneProjection RotationY="180"/>
                </Rectangle.Projection>
                <Rectangle.Fill>
                    <ImageBrush ImageSource="paper.jpg"/>
                </Rectangle.Fill>
            </Rectangle>
            <TextBlock x:Name="TextBlockRightBelow" FontSize="18" Foreground="Black" Margin="30,40,30,30" TextWrapping="Wrap" FontFamily="Baskerville Old Face"/>
        </Grid>
        <Grid x:Name="GridLeftShown" Margin="100,100,0,0" HorizontalAlignment="Left" Width="403" Height="568" VerticalAlignment="Top">
            <Grid.Projection>
                <PlaneProjection CenterOfRotationX="1"/>
            </Grid.Projection>
            <Rectangle HorizontalAlignment="Left" Stroke="Black" Width="403" Height="568" VerticalAlignment="Top" RadiusX="150" RadiusY="20">
                <Rectangle.Fill>
                    <ImageBrush ImageSource="paper.jpg"/>
                </Rectangle.Fill>
            </Rectangle>
            <TextBlock x:Name="TextBlockLeftShown" FontSize="18" Foreground="Black" Margin="30,40,30,30" TextWrapping="Wrap" FontFamily="Baskerville Old Face"/>
        </Grid>
        <Grid x:Name="GridRightShown" Margin="505,100,0,0" Height="568" VerticalAlignment="Top" HorizontalAlignment="Left" Width="403">
            <Grid.Projection>
                <PlaneProjection CenterOfRotationX="0"/>
            </Grid.Projection>
            <Rectangle HorizontalAlignment="Left" Stroke="Black" Width="403" Height="568" VerticalAlignment="Top" RadiusX="150" RadiusY="20">
                <Rectangle.Projection>
                    <PlaneProjection RotationY="180"/>
                </Rectangle.Projection>
                <Rectangle.Fill>
                    <ImageBrush ImageSource="paper.jpg"/>
                </Rectangle.Fill>
            </Rectangle>
            <TextBlock x:Name="TextBlockRightShown" FontSize="18" Foreground="Black" Margin="30,40,30,30" TextWrapping="Wrap" FontFamily="Baskerville Old Face"/>
        </Grid>
        <Button x:Name="ButtonNextPage" Content="Next Page" HorizontalAlignment="Left" Margin="982,118,0,0" VerticalAlignment="Top" Width="128" Click="ButtonNextPage_Click"/>
        <Button x:Name="ButtonPreviousPage" Content="Previous Page" HorizontalAlignment="Left" Margin="982,161,0,0" VerticalAlignment="Top" Click="ButtonPreviousPage_Click"/>
    </Grid>
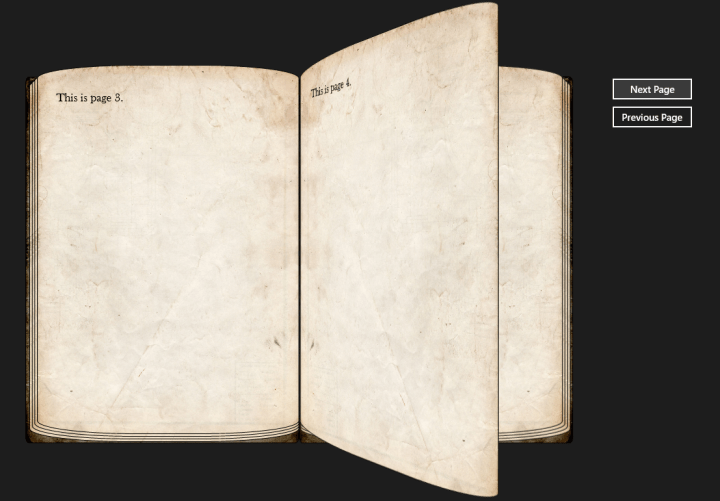
Which will look like this:

Note that in the code, I’ve already set the center of rotation for the grids so our pages will turn the way they are supposed to. This is CenterOfRotationX=”0″ for right grids, and CenterOfRotationX=”1″ for left grids. I’ve also rotated the right side papers to get a symmetrical view (RotationY=”180″ in right-side Rectangles).
Now then, here comes the critical part. Open the project in Blend by right-clicking MainPage.xaml in Solution Explorer and selecting “Open in Blend”.

Click the little plus button in the upper-right corner of Objects and Timeline panel and create a new storyboard named “TurnPageNext”.

We’ll be doing the same trick from the card flip effect animation: To turn the next page, we’ll first rotate the right page up until it is right in the middle (seen as a line). At that moment, we’ll set the visibility of the right page to collapsed, then turn the left page from the middle back to its place. While the pages are being animated, we’ll use the lower grids (the ones that are behind) to show the previous content while the new grids will contain the new content, and it will look like we’ve just turned a page. It may sound complicated, but I think you’ll understand it better when you see the animation code.
So, this is how we will set the animation for TurnPageNext:
For GridRightShown:
– Put an empty keyframe at 0 seconds. This is to avoid mixing up leftover property values when starting the animation.
– Set the Projection Y Angle property to 78.6 at 0.5 seconds. At 78.6 degrees, it becomes only a line from our point of view, which is when we will switch the grids.
– Set the Visibility to Collapsed at 0.5 seconds. If you don’t, it will still be visible as a line.
– Set the Visibility back to Visible at 1 second. We do this to return the grid to the previous state at the end of animation.
– Set the Projection Y Angle property to 0 at 1 second but set the easing of this keyframe to Hold In. To set it to Hold In, select that keyframe in Objects and Timeline panel and select Hold In as the easing option in Properties panel (screenshot below). Hold In will not animate the property over time, but instead directly set it at the specified second. We do this to return the grid to the previous state.
For GridLeftShown:
– Set the Visibility to Collapsed at 0 seconds.
– Set the Visibility to Visible at 0.5 seconds.
– Set the Projection Y Angle property to -78.6 at 0.5 seconds and set the easing of this keyframe to Hold In.
– Set the Projection Y Angle property to 0 at 1 second.

How the animation will look after all is done.

Setting a keyframe’s easing to Hold In.
Here’s how the XAML code of this storyboard looks like:
		<Storyboard x:Name="TurnPageNext">
			<DoubleAnimationUsingKeyFrames Storyboard.TargetProperty="(UIElement.Projection).(PlaneProjection.RotationY)" Storyboard.TargetName="GridRightShown">
				<EasingDoubleKeyFrame KeyTime="0" Value="0"/>
				<EasingDoubleKeyFrame KeyTime="0:0:0.5" Value="78.6"/>
				<DiscreteDoubleKeyFrame KeyTime="0:0:1" Value="0"/>
			</DoubleAnimationUsingKeyFrames>
			<ObjectAnimationUsingKeyFrames Storyboard.TargetProperty="(UIElement.Visibility)" Storyboard.TargetName="GridRightShown">
				<DiscreteObjectKeyFrame KeyTime="0">
					<DiscreteObjectKeyFrame.Value>
						<Visibility>Visible</Visibility>
					</DiscreteObjectKeyFrame.Value>
				</DiscreteObjectKeyFrame>
				<DiscreteObjectKeyFrame KeyTime="0:0:0.5">
					<DiscreteObjectKeyFrame.Value>
						<Visibility>Collapsed</Visibility>
					</DiscreteObjectKeyFrame.Value>
				</DiscreteObjectKeyFrame>
				<DiscreteObjectKeyFrame KeyTime="0:0:1">
					<DiscreteObjectKeyFrame.Value>
						<Visibility>Visible</Visibility>
					</DiscreteObjectKeyFrame.Value>
				</DiscreteObjectKeyFrame>
			</ObjectAnimationUsingKeyFrames>
			<ObjectAnimationUsingKeyFrames Storyboard.TargetProperty="(UIElement.Visibility)" Storyboard.TargetName="GridLeftShown">
				<DiscreteObjectKeyFrame KeyTime="0">
					<DiscreteObjectKeyFrame.Value>
						<Visibility>Collapsed</Visibility>
					</DiscreteObjectKeyFrame.Value>
				</DiscreteObjectKeyFrame>
				<DiscreteObjectKeyFrame KeyTime="0:0:0.5">
					<DiscreteObjectKeyFrame.Value>
						<Visibility>Visible</Visibility>
					</DiscreteObjectKeyFrame.Value>
				</DiscreteObjectKeyFrame>
			</ObjectAnimationUsingKeyFrames>
			<DoubleAnimationUsingKeyFrames Storyboard.TargetProperty="(UIElement.Projection).(PlaneProjection.RotationY)" Storyboard.TargetName="GridLeftShown">
				<EasingDoubleKeyFrame KeyTime="0" Value="0"/>
				<DiscreteDoubleKeyFrame KeyTime="0:0:0.5" Value="-78.6"/>
				<EasingDoubleKeyFrame KeyTime="0:0:1" Value="0"/>
			</DoubleAnimationUsingKeyFrames>
		</Storyboard>
You can press the Play button in Blend to see if it works.
Now, we have to do this again for turning the page back. We won’t use “Duplicate” and “Reverse” to create the new storyboard because what we’ll be doing isn’t exactly the reversed version of the first storyboard. So, we’ll create our storyboard and name it TurnPagePrevious. It is basically the same, except the grids are switched, but still, here’s how you create it step by step.
For GridLefttShown:
– Put an empty keyframe at 0 seconds.
– Set the Projection Y Angle property to -78.6 at 0.5 seconds.
– Set the Visibility to Collapsed at 0.5 seconds.
– Set the Visibility back to Visible at 1 second.
– Set the Projection Y Angle property to 0 at 1 second and set the easing of this keyframe to Hold In.
For GridRightShown:
– Set the Visibility to Collapsed at 0 seconds.
– Set the Visibility to Visible at 0.5 seconds.
– Set the Projection Y Angle property to 78.6 at 0.5 seconds and set the easing of this keyframe to Hold In.
– Set the Projection Y Angle property to 0 at 1 second.
Here’s the XAML code for TurnPagePrevious storyboard:
		<Storyboard x:Name="TurnPagePrevious">
			<DoubleAnimationUsingKeyFrames Storyboard.TargetProperty="(UIElement.Projection).(PlaneProjection.RotationY)" Storyboard.TargetName="GridLeftShown">
				<EasingDoubleKeyFrame KeyTime="0" Value="0"/>
				<EasingDoubleKeyFrame KeyTime="0:0:0.5" Value="-78.6"/>
				<DiscreteDoubleKeyFrame KeyTime="0:0:1" Value="0"/>
			</DoubleAnimationUsingKeyFrames>
			<ObjectAnimationUsingKeyFrames Storyboard.TargetProperty="(UIElement.Visibility)" Storyboard.TargetName="GridLeftShown">
				<DiscreteObjectKeyFrame KeyTime="0">
					<DiscreteObjectKeyFrame.Value>
						<Visibility>Visible</Visibility>
					</DiscreteObjectKeyFrame.Value>
				</DiscreteObjectKeyFrame>
				<DiscreteObjectKeyFrame KeyTime="0:0:0.5">
					<DiscreteObjectKeyFrame.Value>
						<Visibility>Collapsed</Visibility>
					</DiscreteObjectKeyFrame.Value>
				</DiscreteObjectKeyFrame>
				<DiscreteObjectKeyFrame KeyTime="0:0:1">
					<DiscreteObjectKeyFrame.Value>
						<Visibility>Visible</Visibility>
					</DiscreteObjectKeyFrame.Value>
				</DiscreteObjectKeyFrame>
			</ObjectAnimationUsingKeyFrames>
			<ObjectAnimationUsingKeyFrames Storyboard.TargetProperty="(UIElement.Visibility)" Storyboard.TargetName="GridRightShown">
				<DiscreteObjectKeyFrame KeyTime="0">
					<DiscreteObjectKeyFrame.Value>
						<Visibility>Collapsed</Visibility>
					</DiscreteObjectKeyFrame.Value>
				</DiscreteObjectKeyFrame>
				<DiscreteObjectKeyFrame KeyTime="0:0:0.5">
					<DiscreteObjectKeyFrame.Value>
						<Visibility>Visible</Visibility>
					</DiscreteObjectKeyFrame.Value>
				</DiscreteObjectKeyFrame>
			</ObjectAnimationUsingKeyFrames>
			<DoubleAnimationUsingKeyFrames Storyboard.TargetProperty="(UIElement.Projection).(PlaneProjection.RotationY)" Storyboard.TargetName="GridRightShown">
				<EasingDoubleKeyFrame KeyTime="0" Value="0"/>
				<DiscreteDoubleKeyFrame KeyTime="0:0:0.5" Value="78.6"/>
				<EasingDoubleKeyFrame KeyTime="0:0:1" Value="0"/>
			</DoubleAnimationUsingKeyFrames>
		</Storyboard>
Save the project and switch back to Visual Studio, which will ask you if you wish to reload the files that were changed outside the editor. Say yes.

Our app is nearly complete, but by themselves these storyboards are not enough. As I’ve said at the beginning of this article, we have to do a little bit of juggling in codebehind to achieve the desired effect. We’ll basically set the contents of the upper grids to the lower grids, then animate the upper grids with the new content, and after the animation is complete, make sure the upper grids have the new content (since one of the grids will not have the new content, depending on the turning direction). The code will explain it better, so we’ll add the following in MainPage.xaml.cs (you’ll need to build the project once to see the storyboards):
        List<string> pageContent;
        int currentPage = 0;
        int pageCount = 8;

        public MainPage()
        {
            this.InitializeComponent();
            this.Loaded += MainPage_Loaded;
        }

        void MainPage_Loaded(object sender, RoutedEventArgs e)
        {
            TurnPageNext.Completed += TurnPageNext_Completed;
            TurnPagePrevious.Completed += TurnPagePrevious_Completed;
            ButtonPreviousPage.IsEnabled = false;

            pageContent = new List<string>();
            for (int i = 1; i < pageCount + 1; i++)
            {
                pageContent.Add(String.Format("This is page {0}.", i));
            }
            TextBlockLeftShown.Text = pageContent[currentPage];
            TextBlockRightShown.Text = pageContent[currentPage + 1];
        }

        void TurnPagePrevious_Completed(object sender, object e)
        {
            TextBlockLeftShown.Text = TextBlockLeftBelow.Text;
        }

        void TurnPageNext_Completed(object sender, object e)
        {
            TextBlockRightShown.Text = TextBlockRightBelow.Text;
        }

        private void ButtonNextPage_Click(object sender, RoutedEventArgs e)
        {
            currentPage += 2;
            ButtonPreviousPage.IsEnabled = true;

            TextBlockLeftBelow.Text = TextBlockLeftShown.Text;
            TextBlockRightBelow.Text = pageContent[currentPage + 1];

            TurnPageNext.Begin();

            TextBlockLeftShown.Text = pageContent[currentPage];

            if (currentPage + 2 == pageCount)
            {
                ButtonNextPage.IsEnabled = false;
            }
        }

        private void ButtonPreviousPage_Click(object sender, RoutedEventArgs e)
        {
            currentPage -= 2;
            ButtonNextPage.IsEnabled = true;

            TextBlockRightBelow.Text = TextBlockRightShown.Text;
            TextBlockLeftBelow.Text = pageContent[currentPage];

            TurnPagePrevious.Begin();

            TextBlockRightShown.Text = pageContent[currentPage + 1];

            if (currentPage == 0)
            {
                ButtonPreviousPage.IsEnabled = false;
            }
        }
As you can see in the code, when we are turning the page, we set the contents of the relative textblocks. We push the current page’s contents to the lower grid, and after the animation has started, set the new content for the upper grid (so the visibility in the storyboard handles when the new content will be shown). After the animation is complete, the we set the new content to the upper grid again.
Anyway, enough yapping, let’s run the app!


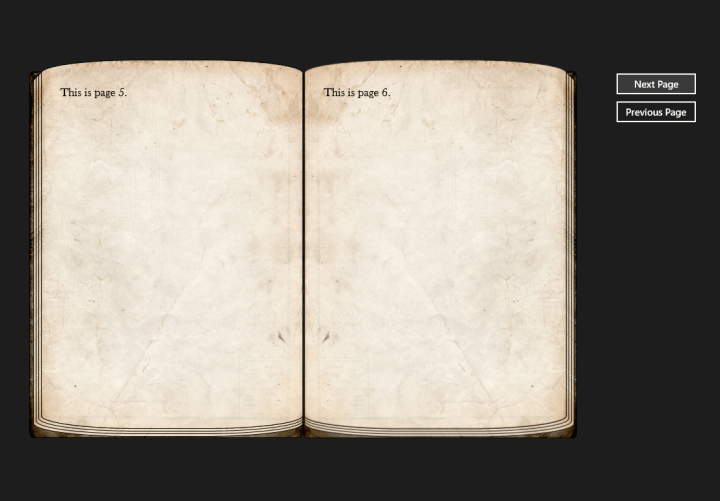
Not bad… Not bad at all, don’t you think? 🙂
Now, we can even take this one step further and add the textblocks or other controls into the grids at runtime. This way, we can have pages that contain images, or even interactive books. Actually, I have plans for making a choose-your-adventure style game using this. 🙂
You can get the example’s source code here.
Thank you for reading and see you in my next articles. 🙂

Nicely done!
Thanks for the excelent tutorial!!!, It could work in Visual Studios 2013 with windows 7?
Thanks , Great Work . 😀
Thank you so much!!
My visual studio dont recongize the property of Projection..
what can i do?
hello, thanks for tuto, but hoe can add text of images like a book?