
When making an application, using animations is a good way to impress the user and make your application look better. Either for making a more lively menu with sliding buttons or adding some visual effects to the background, animations come as a very simple yet powerful tool for good looking applications. In this article we will be developing a Windows Store application that contains several different animations which show several different features.
I will explain how animations work as we build our application, so we will start with opening up Visual Studio and creating a new Windows Store app.

In the MainPage.xaml, add a button which will be used to start the animation.
    <Grid Background="{StaticResource ApplicationPageBackgroundThemeBrush}">
        <Button x:Name="startAnimationButton" Content="Let the show begin" HorizontalAlignment="Left" Margin="100,100,0,0" VerticalAlignment="Top"/>
    </Grid>
Then, right-click MainPage.xaml and select “Open in Blend”.

In Blend, we will need to use a Storyboard to make animations. A storyboard is a container for animation timelines, which will be explained a little later. Therefore, we will first add an object to animate (I’ve added a red ellipse) and then create a storyboard.


An animation consists of one or more keyframes – points which define how the animated object will look like at the specified time. The animation will play from one keyframe to another, by interpolating the differences between the two keyframes. It is better explained with an example: Assume that at the beginning we have a keyframe that says our object’s TranslateX value is 0. Also assume that at the 3rd second we have another keyframe that says our object’s TranslateX value is 100. If we use default options and play the animation, our object will go from x=0 to x=100 in 3 seconds with a constant speed.
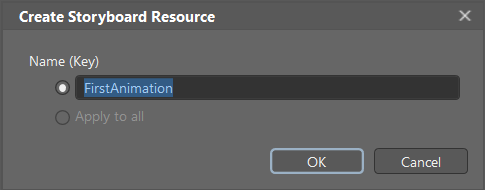
Let’s do this with our first animation. After you create the storyboard, it would automatically open and timeline recording will be on. Timeline recording being on means that the changes we make to the object on the workspace will be saved as a keyframe at the time we selected. We can also add timeframes manually by clicking “Record keyframe” button. We will add a keyframe to the beginning (0th second), and then select 3rd second, and finally drag the ellipse a little down.


You can now preview the animation by clicking the Play button in the Objects and Timeline panel.

You will see that our object is moving down at a constant rate.
We have an animation, but it is extremely simple. To make it more usable, we could change its “easing”, which is the curve of the animated value over time. Currently we have no easing, so our ellipse moves down at a constant speed. Select the keyframe at the 3rd second and expand the list of easing function to see possible easing values we can use.

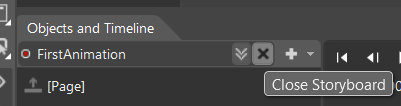
Select “Power In” for a falling motion, or “Bounce Out” for a bouncing motion. Close the FirstAnimation storyboard by clicking the “X” button near the storyboard name.
So far, we have only moved our ellipse, by animating its RenderTransform property (TranslateX and TranslateY values). We could have also rotated, scaled or skewed our object. However, we can actually animate many more properties. To show this, add another ellipse, create a second storyboard, and set the keyframe for the 0th second.
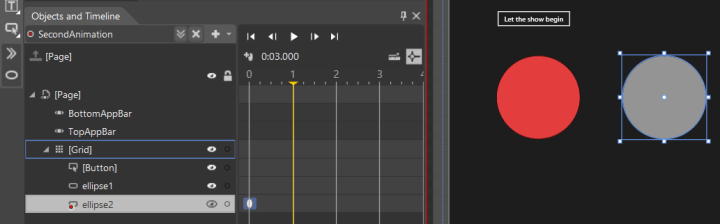
At the 1st second, while the timeline recording is on, change the color of the ellipse. Then select the keyframe and make the easing “Bounce InOut”. When you preview it, you will see that it changes color, with an effect similar to a light bulb turning on.
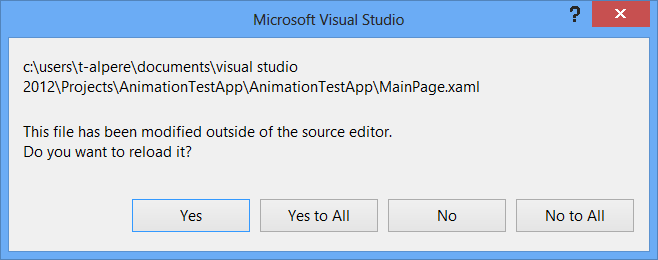
Now save the MainPage.xaml file in Blend and go back to Visual Studio. It will tell that the files have been changed and ask if you wish to reload them. Click Yes, and our changes in Blend will be carried to Visual Studio.
Then right-click the project and select build, so we could see our storyboard in the codebehind. After the build is complete, we will add these lines of code to start our animations when the button is clicked:
        private void startAnimationButton_Click(object sender, RoutedEventArgs e)
        {
            FirstAnimation.Begin();
            SecondAnimation.Begin();
        }
When we run our application and click the button, our animations will play.
If you examine our storyboard objects, you can see that we have many options about our storyboards, such as: AutoReverse option which plays the animation backwards after it is completed, BeginTime which allows us to set a delay for the beginning of the animation, RepeatBehavior which sets how many times the animation should be repeated, etc. You can experiment with these options for interesting and generally fun results. 🙂
Speaking of fun, I wish to end this article with a fun animation. Copy and paste this into the MainPage.xaml, after our other animations:
<Storyboard x:Name="MyHeadIsSpinning">
			<DoubleAnimationUsingKeyFrames Storyboard.TargetProperty="(UIElement.RenderTransform).(CompositeTransform.Rotation)" Storyboard.TargetName="grid">
				<EasingDoubleKeyFrame KeyTime="0" Value="0"/>
				<EasingDoubleKeyFrame KeyTime="0:0:3" Value="-1440"/>
			</DoubleAnimationUsingKeyFrames>
			<DoubleAnimationUsingKeyFrames Storyboard.TargetProperty="(UIElement.RenderTransform).(CompositeTransform.ScaleX)" Storyboard.TargetName="grid">
				<EasingDoubleKeyFrame KeyTime="0" Value="1"/>
				<EasingDoubleKeyFrame KeyTime="0:0:3" Value="-1"/>
			</DoubleAnimationUsingKeyFrames>
			<DoubleAnimationUsingKeyFrames Storyboard.TargetProperty="(UIElement.RenderTransform).(CompositeTransform.ScaleY)" Storyboard.TargetName="grid">
				<EasingDoubleKeyFrame KeyTime="0" Value="1"/>
				<EasingDoubleKeyFrame KeyTime="0:0:3" Value="-1"/>
			</DoubleAnimationUsingKeyFrames>
			<DoubleAnimationUsingKeyFrames Storyboard.TargetProperty="(UIElement.RenderTransform).(CompositeTransform.TranslateX)" Storyboard.TargetName="grid">
				<EasingDoubleKeyFrame KeyTime="0" Value="0"/>
				<EasingDoubleKeyFrame KeyTime="0:0:3" Value="1"/>
			</DoubleAnimationUsingKeyFrames>
			<DoubleAnimationUsingKeyFrames Storyboard.TargetProperty="(UIElement.RenderTransform).(CompositeTransform.TranslateY)" Storyboard.TargetName="grid">
				<EasingDoubleKeyFrame KeyTime="0" Value="0"/>
				<EasingDoubleKeyFrame KeyTime="0:0:3" Value="-3"/>
			</DoubleAnimationUsingKeyFrames>
		</Storyboard>
        private void startAnimationButton_Click(object sender, RoutedEventArgs e)
        {
            FirstAnimation.Begin();
            SecondAnimation.Begin();

            MyHeadIsSpinning.AutoReverse = true;
            MyHeadIsSpinning.RepeatBehavior = Windows.UI.Xaml.Media.Animation.RepeatBehavior.Forever;
            MyHeadIsSpinning.Begin();
        }
The result will be these in an unstoppable infinite loop:


When used properly, simple animations like these (not like the last one, though) could make a big difference about the looks of your application. 🙂
You can get the source code here.

Thanks for the great introduction to storyboards!