Hi there,
It’s been a long time since I wrote a new post or replied to comments, and it looks like I won’t be doing so for the foreseeable future.
Thank you.

Hi there,
It’s been a long time since I wrote a new post or replied to comments, and it looks like I won’t be doing so for the foreseeable future.
Thank you.
When you are using external data sources in your app, such as a database on a remote server, one of the most common issues you encounter during development is that you may not have access to the data you’re going to use in the app. The database may not be created or populated yet, you might not have access to the database at this point or you may just want to prepare a mock-up for prototyping or presentation purposes and don’t want to spend time and effort for a database. This situation causes some minor inconveniences for developers and (especially) designers in two areas: When you are designing the app, and when you are running it.
During design time, you see the values of binded objects empty. So if you bind the text of a TextBlock object, it will be blank. To cope with this, designers would usually create the design with some placeholder values and apply the bindings after that. However, this has the following three downsides: You still can’t see how the app will look in design time; you can see what parts of the design needs to be fixed only when the app is running; and to fix the design you have to break the bindings, give placeholder values again, modify the design and then apply the bindings again, which gets annoying quite fast and makes designing process harder. For example, look at the following image from the example WinRT app we’ll create in this article:

The user information (including the picture) is binded to a data source. This is how it looks in runtime, in a GridView.

And this is how that GridView’s item template looks like in design time. The GridView itself doesn’t even show anything in the XAML designer.
During runtime, you need to create the sample data and set your object’s ItemsSource in the codebehind file. This has the following issues: If you are purely a designer, this requires you to mess with the code so it may be an issue for both you and your project team; you need to enter sample values yourself; and you need to remove the code you’ve added when you are able to connect to the live database.
Fortunately, to overcome these issues, Blend provides us a handy feature called Sample Data which allows us to create a sample data source that generates values based on our specifications and then bind our objects to that sample data source. Considering the benefit of using sample data without writing a single line of code and being able to see the sample values both within runtime and design time, this feature helps us solve the aforementioned problems and simplifies the designing process. And of course, in this article, we’ll create a Windows Store app in Blend that uses a sample data source.
➤ Sample data can be used in WPF, Silverlight, WinRT and Windows Phone…
One of the most prominent features of Windows Azure is no doubt Windows Azure SQL Databases, which allows us to have a database on the cloud and benefit from the advantages of cloud computing, such as high-availability and scalability. Azure’s portal interface allows us to easily manage the database, and by using a cloud service as an API for our backend we can quickly access the database from any platform.
In this step by step article, we’ll create a Windows Azure SQL Database, create a web service which connects to this database and allows us to perform specific operations on it and then use that web service in a Windows Store app.
1) Creating the Windows Azure SQL Database
Obviously, you’ll need to have an Azure account to do this. You can go to http://www.windowsazure.com and click on the Free Trial option on the upper right and follow the instructions to get a free 1 month trial. Keep in mind that although it is free, you still need to enter a valid credit card information for validation purposes.

After you get an Azure account (or if you already have one), click “Portal” on the upper right or go to http://manage.windowsazure.com and log into the Management Portal.
In XAML, styles are resources which define the appearance of a control. By creating new styles (or modifying existing ones), you can customize how a control looks to have a more creative and beautiful interface. Since styles are resources, you can just create one that suits your needs and apply it to any suitable control you want.
However, when you create (or modify) a style, if you define everything in it explicity, you will be left with a very inflexible control which you can not further customize. For example, assume we have a bubbly button which has many small circles around it that represents the bubbles, like this:

I’ve added these bubbles explicitly with white color, so they will stay white no matter what. But what if I decide to use the button with a different background color in different parts of the app?
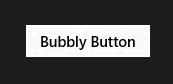
The circles are barely visible now.
A solution to that would be creating a different style for each different color you would use, but that would be tedious and ineffective to say the least. Instead, why don’t we tell the bubbles to have the same color with the Button object’s Foreground property? This way, the style would just add the bubbles without specifying their color and we could set the color of each individual Button object the way we want. Sounds good, right?
Well, what I just described is called template-binding. Within a style or template, you can tell a property to get its value from the object that the template or style is applied to. You can template-bind any compatible properties together to achieve your desired effect.
And in this article, we’ll create a sample project which uses template-binding in order to create… EVIL BUTTONS!!1 *insert evil laugh here*

This is an evil button with horns. Notice that the horns get their fill and border colors from the Button object.
The web.config file contains the configuration options for a web service, some of which could contain sensitive information that you don’t want to be kept in plain text. For example, it is very likely that you’ll connect to a database in your web service, and the connection string you use will be kept in the web.config file. The connection string includes the username and password used in the database server, so if you plan to keep your web service in a 3rd party server or if someone that you don’t want to learn the database credentials needs to work on the source code, you could add an extra layer of security by encrypting this data.
<connectionStrings>
  <add name="DatabaseConnectionString" connectionString="Data Source=blablabla.database.windows.net;Initial Catalog=BlaBlaDB;User ID=yourusername;Password=yourpassword"
    providerName="System.Data.SqlClient" />
</connectionStrings>
.NET Framework provides a feature called “protected configuration” which prevents our data from being shown like in the code above, by encrpyting the configuration data using DpapiProtectedConfigurationProvider or RsaProtectedConfigurationProvider classes. However, both of these two encryption methods need to be applied on the server that hosts the web service, because the encrpytion process uses a machine-specific key. Since we can’t do this on Azure… what can we do to encrypt the web.config of our cloud services?
Well, if we want to encrpyt our web.config files in Azure cloud services, we need to use a special “protected configuration provider”. In this article, we’ll create a .pfx certificate and use “Pkcs12 Protected Configuration Provider” which performs the encryption using a certificate and Windows Azure Certificate Store, to encrypt our web.config file.
➤ Anyone with the connection string can access your database, and you definitely do not want that…
Sometimes, small details can make or break your app in the long run. An extra 10 minutes you spend on a feature can leave a lasting good impression, whereas an extra 10 minutes you don’t spend can make the user deem the app unusable and forget it altogether.
This issue especially important in mobile app development, for two reasons:
1) The attention span of the users is limited in mobile apps. It is quite likely that they won’t stare at the app for hours: They’ll open it when they need it, use it for a few moments and then close it. Therefore the app has to be practical and impress the user in this limited time. If something frustrates the user at this point (especially when running for the first time), the app will probably be put away and never opened again.
2) Nowadays it is possible to create mobile apps in a matter of days. This can cause the developers to rush the development to put the app on the market as soon as possible, either because of time constraints or because of the urge to complete the app now that we’re very close to finishing it.
Well, this may not be the whole issue in WinRT apps since they are used in many devices ranging from tablets to laptops to PCs, but they are still treated as mobile apps and still they are subject to the aforementioned reasons. Combined with the fact that thousands of new apps are pouring into the market daily, you need to pay attention to details and think of the long run as a developer if you wish your apps to excel.
First of all, there are many guidelines for WinRT in the Dev Center and taking a look at them could help you a lot. There is a large amount of reading material, but just browsing or looking at the parts that intrigue you can help you make more beautiful and usable apps more quickly. Here are the links for an overview of Windows Store Apps, UX Guidelines for Windows Store apps and Planning Windows Store apps.
So, since I’ve developed and seen my share of WinRT apps in the last 1.5 years, I have come up with a list of some tips about what not to do in your Windows Store apps. Note that if you are familiar with WinRT, chances are you might already know some – most – all of the items I’m going to list here. But still, simple != unimportant, so take a look and see if there is something you haven’t seen or thought before, because these are the things that help increase the quality of your app.
Well then, let’s start the list. Keep in mind that they are not ordered in any way; I’m writing them as they pop up in my head. 🙂
➤ The good thing is, most of these small tips require at most 10 – 15 minutes of effort from you…
Any person that has a basic computer knowledge can go ahead and use Microsoft Network Monitor, Fiddler or any other similar application to monitor his/her own network traffic, whereupon he/she will see that the applications which use HTTP have their data displayed plainly. And people with a little more technical knowledge can go further and use other applications (such as Cain and Abel) to sniff the whole network, which will include packages from every computer connected to it. So, someone just logged in to a website that used HTTP while you were listening to the network? Well, tough luck for him/her, because you’ve just sniffed the username and password.
For demonstration, I’ve created an Azure Cloud Service that has a method which returns the number of characters for a given string. And as you see, Fiddler directly catches my request to the web method and its response:

This is what I sent to the web method.

And this is what the web method returned.
Of course, a competent developer would take precautions against this. We use hashing and salting for username – passwords so they are not displayed plainly, but still, we don’t want people to get the hashed version either, because then they could try decrypting it or use that hashed version to make calls to our service themselves. Therefore, we need more security.
This is where HTTPS comes in, which is actually the HTTP protocol with SSL on top. SSL (Secure Socket Layer) uses certificates for encryption and authorization, therefore allowing a secure communication over the network. Many applications (such as e-mail, instant messaging or voice-over-IP applications) use this to ensure security, and in this article, we’ll see how we can use it in our own Azure Cloud Service.
Animations, when done properly, are a guaranteed way of increasing the visual appeal of an app. In my previous blog posts, we’ve seen how we can make simple animations in Blend, and later we’ve seen how we can combine these simple animations to make a card flip effect. So, contiuning on in this trend, I’ve set my eyes on the another such frequently used and nice-looking effect: Turning a page.
If you look at the card flip effect example, you can see that we can actually use it for turning a page by changing the center of rotation of the objects. However, this will result in stiff looking rectangle pages which lack the curvy edges of a real page. So, how can we turn that page more realistically?
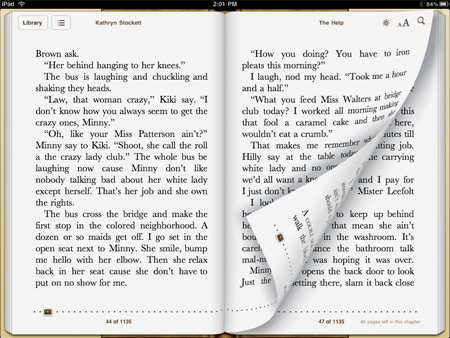
Unfortunately, we can’t make it look as good as this. At least, not easily.
It is not possible to create an effect in Blend like shown in the screenshot. You can, however, create such an effect in code, using bezier curves and whatnot. But it looks quite complicated, and I’ve seen people suggesting to use Direct2D instead of creating such animations in code. Also, while searching, I’ve come across some code examples or custom user controls but they were generally for WPF (I’ve only found one custom control for WinRT, and it wasn’t free).
So our best bet would be animating curves in codebehind, or learning Direct2D. Unfortunately, ain’t nobody got time for that.
If you are muttering to yourself “But.. but, I just wanted to turn a simple page, nothing fancy!”, then you are at the right place. We can play around in Blend a little to make it “sort of” curvy and look just like shown in the video below:
In this article, we’ll create an example app which will have a book where the user can turn the pages with the animation shown above.
➤ Here I am, on the road again.. There I am, up on the stage..
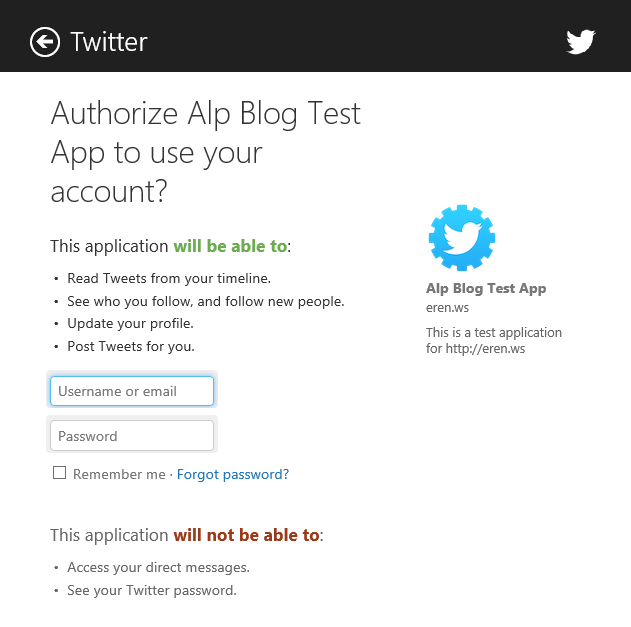
In this previous blog post I’ve talked about why integrating Twitter in our apps is a good idea and then created a sample app which fetched a public Twitter feed without requiring the user to log in. However, this was just a small feature, and we may wish to take it a step further and allow the user to login to Twitter and publish tweets directly from our app, or maybe make the user follow a specific Twitter user, display favorite tweets or allow the user retweet and so on.
If you try to use Twitter’s REST API to do this, however, you are in for quite a ride. Because of security reasons, trying to do some operations may cause you to mutter “wtf” to yourself several times in a short time span, such as constructing the HTTP request for authorization, since it only accepts parameters that require specific encryptions and encodings (see for yourself). It is, of course, not impossible, but it is time consuming. Therefore, we’ll be going the easy way, by using an open source 3rd party library called Linq to Twitter that does these operations itself and allows us to reach every function of the Twitter API way more easily. Linq to Twitter also allows us to query Twitter using Linq syntax (hence the name), which I really liked.
So, in this article we’ll create a Windows Store app that allows the user to sign in with his/her Twitter account, get and display the user’s basic information, and let the user send a tweet from inside the app.
➤ Twitter API is actually quite nice as it allows you to do anything you could on the website itself
In one of my previous blog posts I’ve talked about how we can make simple animations in Blend and shown how we can move stuff around in our interface. However, our animations would need to be a lot better than moving several elements around or spinning them in order to be visually appealing.
And one of the most widely used effects is, of course, flipping something onscreen like a card. This effect not only looks good, but also can be used as a nice transition animation between several elements in your page. And it is really easy to implement by using Blend. Here are the videos of the example app we will make (source code is at the bottom of the page :)):
My computer is a bit old, so it caused some stuttering when saving the videos. The animations are quite smooth in the app. 🙂
So, if this has grabbed your attention, read on and we will create the example app shown in the videos above.
