
Hi everyone,
Due to its compact nature, Twitter can be used to provide content about a specific topic or to provide latest news to users in a quite efficient way. For example, an app about the latest news in technology could get the latest tweets with a specific hashtag, or a news app can get the latest tweets from the Twitter accounts of news agencies. We can even add further functionality and allow the user to open the links in a tweet, or go to the Twitter account page of the poster. Adding such a public Twitter feed is usually a good addition to an app, and does not require the user to log in with his/her Twitter account.

In this article, we will be making a simple Windows Store app that uses Twitter REST API v1.1 to get the latest tweets for a specific hashtag, and we’ll also allow the user to open the poster’s account page for a selected tweet.
Before we start making our application, we have to create a Twitter application on the developer website of Twitter, because as of v1.1 of Twitter API we need to authenticate our app using a consumer key and consumer secret in order to get the tweets (even the public tweets). To do this, we’ll need to go to https://dev.twitter.com/ and sign in with our Twitter account.

On the upper right corner, select “My Applications”, and on the next page, click “Create New Application”.


In the next page, we’ll be asked for a name, description, website and a callback uri for our app. We won’t be needing a callback uri so you can leave it blank, and you can put anything for the website part. In this article, our app’s users won’t see anything about what we write here because we will just be getting public tweets and not signing in with the users’ accounts.

After filling in the required sections, accept the “Developer Rules of the Road”, enter the Capthcha and then click “Create your Twitter application”. When you do this, a page that provides the details for your application will open.
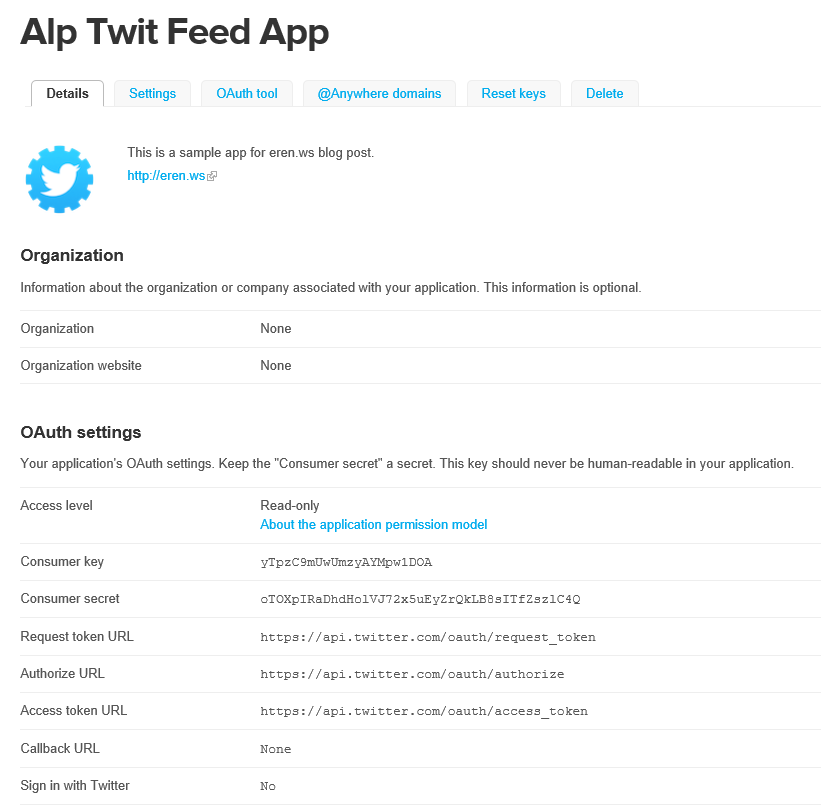
The consumer key and the consumer secret will be needed a few steps later, therefore keep this page open in the background.
We can now begin creating our Windows Store app. Open up Visual Studio 2012 and create a new blank Windows Store app.

We’ll get the tweets serialized in JSON format, therefore we’ll need to add a library to deserialize JSON. To do this, right click References in Solution Explorer, select “Manage NuGet Packages”, search for “Json.Net” and click Install.


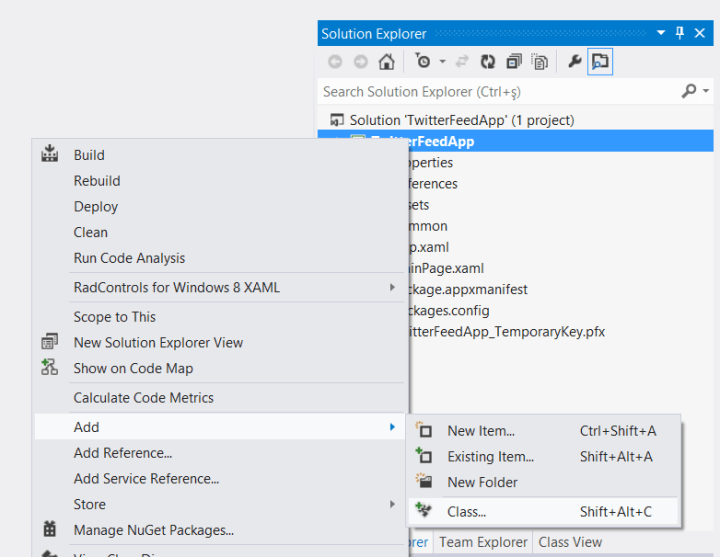
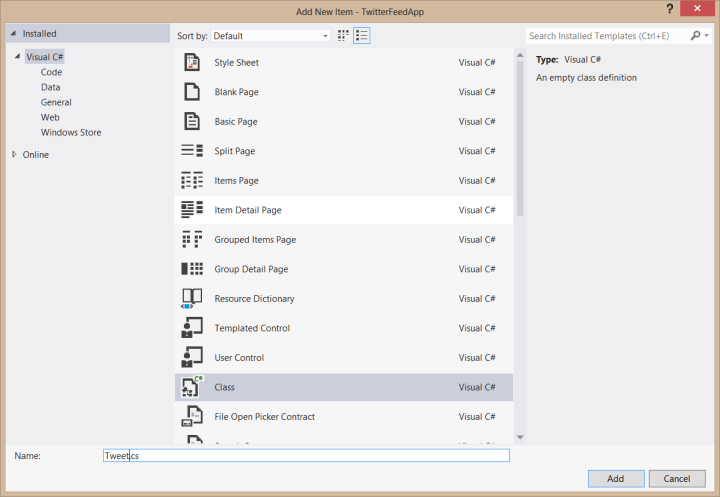
Then, we’ll need to create a class for our tweets. Right click the project, highlight “Add” and then click “Class”. Name it “Tweet.cs”.
In our Tweet class, we’ll need four fields: Name, UserName, Image and Message. This information will be enough to present the tweets. Our Tweet.cs file will look like this:
using System;
using System.Collections.Generic;
using System.Linq;
using System.Text;
using System.Threading.Tasks;

namespace TwitterFeedApp
{
    class Tweet
    {
        public string Message { get; set; }
        public string Image { get; set; }
        public string Name { get; set; }
        public string UserName { get; set; }
    }
}
Next, we’ll need to arrange our interface. In MainPage.xaml, our XAML should look like this:
    <Page.Resources>
        <DataTemplate x:Key="TweetListViewDataTemplate">
            <Grid Width="400" Height="125" Background="#FF3B48AA">
                <Image Width="75" Height="75" HorizontalAlignment="Left" Margin="12.5,0,0,0" Source="{Binding Image}"/>
                <TextBlock Text="{Binding Name}" FontFamily="Segoe UI Light" FontSize="14" TextTrimming="WordEllipsis" FontWeight="Light" HorizontalAlignment="Left" VerticalAlignment="Top" Margin="95,15,0,0"/>
                <TextBlock Text="{Binding UserName}" FontFamily="Segoe UI Light" FontSize="14" TextTrimming="WordEllipsis" FontWeight="Light" HorizontalAlignment="Left" VerticalAlignment="Top" Margin="95,35,0,0" Foreground="White"/>
                <TextBlock Text="{Binding Message}" FontFamily="Segoe UI Light" FontSize="14" TextTrimming="WordEllipsis" FontWeight="Light" HorizontalAlignment="Left" VerticalAlignment="Top" Margin="95,57,0,0" Height="58" Width="295" TextWrapping="Wrap"/>
            </Grid>
        </DataTemplate>
    </Page.Resources>

    <Grid Background="{StaticResource ApplicationPageBackgroundThemeBrush}">
        <ProgressBar x:Name="ProgressBar" Height="40" VerticalAlignment="Top" Visibility="Collapsed"/>
        <ListView SelectionMode="None" IsItemClickEnabled="True" x:Name="TweetListView" HorizontalAlignment="Left" Margin="100,120,0,100" Width="435" ItemTemplate="{StaticResource TweetListViewDataTemplate}" ItemClick="TweetListView_ItemClick"/>
        <Button Click="RefreshButton_Click" x:Name="RefreshButton" Content="Refresh" HorizontalAlignment="Left" Margin="540,120,0,0" VerticalAlignment="Top"/>
    </Grid>
We’ve added a ListView where the Tweets will be shown (and a DataTemplate for it, with bindings), a ProgressBar, and a button to refresh the tweets. We’ve also added an ItemClick event for the ListView, which will be used when we want to open the poster’s Twitter account page.
Now, we’ll need to get the tweets when our application opens. To do this, we’ll need to write this code in our MainPage.xaml.cs file:
using System.Net.Http;
using Newtonsoft.Json;
using Newtonsoft.Json.Linq;
using Windows.UI.Popups;
        public MainPage()
        {
            this.InitializeComponent();
            this.Loaded += MainPage_Loaded;
        }

        void MainPage_Loaded(object sender, RoutedEventArgs e)
        {
            GetTweets();
        }

        async private void GetTweets()
        {
            try
            {
                RefreshButton.IsEnabled = false;
                ProgressBar.IsIndeterminate = true;
                ProgressBar.Visibility = Visibility.Visible;
                string consumerKey = System.Net.WebUtility.UrlEncode("yTpzC9mUwUmzyAYMpw1DOA");     //Put your own consumer key here.
                string consumerSecret = System.Net.WebUtility.UrlEncode("oTOXpIRaDhdHolVJ72x5uEyZrQkLB8sITfZszlC4Q");   // Put your own consumer secret here.
                byte[] tokenBytes = System.Text.Encoding.UTF8.GetBytes(consumerKey + ":" + consumerSecret);
                string tokenCredentials = System.Convert.ToBase64String(tokenBytes);

                Uri authUri = new Uri("https://api.twitter.com/oauth2/token");
                var client = new HttpClient();
                var authContent = new HttpRequestMessage(HttpMethod.Post, authUri);
                var values = new List<KeyValuePair<string, string>>();
                values.Add(new KeyValuePair<string, string>("grant_type", "client_credentials"));
                authContent.Content = new FormUrlEncodedContent(values);
                authContent.Headers.Add("Authorization", "Basic " + tokenCredentials);
                HttpResponseMessage authResponse = await client.SendAsync(authContent);

                string authResponseString = await authResponse.Content.ReadAsStringAsync();
                JObject authJsonObject = await JsonConvert.DeserializeObjectAsync<JObject>(authResponseString);
                string access_token = authJsonObject["access_token"].ToString();

                Uri getUri = new Uri("https://api.twitter.com/1.1/search/tweets.json?q=%23Microsoft");  //%23blabla means we get the tweets with #blabla hashtag, replace with anything you like
                var getContent = new HttpRequestMessage(HttpMethod.Get, getUri);
                getContent.Headers.Add("Authorization", "Bearer " + access_token);
                HttpResponseMessage getResponse = await client.SendAsync(getContent);

                string getResponseString = await getResponse.Content.ReadAsStringAsync();
                JObject getJsonObject = await JsonConvert.DeserializeObjectAsync<JObject>(getResponseString);
                var tweetObjects = getJsonObject["statuses"].ToList();
                List<Tweet> tweetList = new List<Tweet>();
                foreach (JObject tweet in tweetObjects)
                {
                    Tweet t = new Tweet();
                    t.UserName = "@" + tweet["user"]["screen_name"].ToString();
                    t.Name = tweet["user"]["name"].ToString();
                    t.Message = tweet["text"].ToString();
                    t.Image = tweet["user"]["profile_image_url"].ToString();
                    tweetList.Add(t);
                }
                TweetListView.ItemsSource = tweetList;
                ProgressBar.Visibility = Visibility.Collapsed;
                ProgressBar.IsIndeterminate = false;
                RefreshButton.IsEnabled = true;
            }
            catch (Exception e)
            {
                ProgressBar.Visibility = Visibility.Collapsed;
                ProgressBar.IsIndeterminate = false;
                RefreshButton.IsEnabled = true;
                MessageDialog messageDialog = new MessageDialog("Could not get tweets: " + e.Message);
                messageDialog.ShowAsync();
            }
        }
In the GetTweets method, keep in mind that you have to set your own consumer key and consumer secret. In this example, after getting the authentication token we’re getting the latest 15 tweets with the #Microsoft hashtag. You can refer to Twitter API documentation to see how else you can get tweets here.
If we build and run the app right now, we’ll see that we can get the tweets. The final thing we need to add is the Refresh button Click event, and ListView ItemClick event:
        async private void TweetListView_ItemClick(object sender, ItemClickEventArgs e)
        {
            Tweet clickedTweet = e.ClickedItem as Tweet;
            string userName = clickedTweet.UserName.Remove(0,1);
            await Windows.System.Launcher.LaunchUriAsync(new Uri("https://twitter.com/" + userName));
        }

        private void RefreshButton_Click(object sender, RoutedEventArgs e)
        {
            GetTweets();
        }
Our application is complete. 🙂 We can use the refresh button to refresh the tweet list, and when we click on a tweet the poster’s page will open in our default browser.


You can get the source code of the app here. Again, don’t forget to add your own consumer key and consumer secret (because the one that I put here may be deleted).
See you in next articles. 🙂

Awesome Man 🙂