
When you are developing an app, supporting multiple languages simply ensures you a wider audience, and users generally feel better about an app when it is in their native language. I’ve also seen it many times where a user gives a very low rating to an otherwise good app only because it doesn’t support their native language (yes, users are ruthless :)). Therefore, it is a good idea to add a mechanism which either allows the user to select/change the app’s language, or detects the system’s language programatically and uses it in the app.

In English.

Same page in Turkish.
In this article, we will see how we can make a Windows Store application which supports multiple languages, and how we can detect the system’s own language.
Let’s start with opening a new blank Windows Store project in Visual Studio.

We’ll create the interface first. In MainPage.xaml, we’ll add a title to our page, some textblocks and textboxes to resemble a form, a combobox for language selection and a button to detect the system language. It will look like this:
    <Grid Background="{StaticResource ApplicationPageBackgroundThemeBrush}">
        <StackPanel HorizontalAlignment="Left" Margin="100,150,0,0" Width="500">
            <Grid>
                <TextBlock x:Name="TextBlockName" TextWrapping="Wrap" Text="Name:" HorizontalAlignment="Left" FontSize="15" VerticalAlignment="Center" Width="195" TextAlignment="Right"/>
                <TextBox HorizontalAlignment="Left" Width="200" Grid.Column="2" Margin="200,0,0,0"/>
            </Grid>
            <Grid Margin="0,10,0,0">
                <TextBlock x:Name="TextBlockSurname" TextWrapping="Wrap" Text="Surname:" HorizontalAlignment="Left" FontSize="15" VerticalAlignment="Center" Width="195" TextAlignment="Right"/>
                <TextBox HorizontalAlignment="Left" Width="200" Grid.Column="2" Margin="200,0,0,0"/>
            </Grid>
            <Grid Margin="0,10,0,0">
                <TextBlock x:Name="TextBlockAge" TextWrapping="Wrap" Text="Age:" HorizontalAlignment="Left" FontSize="15" VerticalAlignment="Center" Width="195" TextAlignment="Right"/>
                <TextBox HorizontalAlignment="Left" Width="200" Grid.Column="2" Margin="200,0,0,0"/>
            </Grid>
            <Grid Margin="0,10,0,0">
                <TextBlock x:Name="TextBlockPhoneNumber" TextWrapping="Wrap" Text="Phone Number:" HorizontalAlignment="Left" FontSize="15" VerticalAlignment="Center" Width="195" TextAlignment="Right"/>
                <TextBox HorizontalAlignment="Left" Width="200" Grid.Column="2" Margin="200,0,0,0"/>
            </Grid>
            <Grid Margin="0,10,0,0">
                <TextBlock x:Name="TextBlockCountry" TextWrapping="Wrap" HorizontalAlignment="Left" FontSize="15" VerticalAlignment="Center" Width="195" TextAlignment="Right" Text="Country:"/>
                <TextBox HorizontalAlignment="Left" Width="200" Grid.Column="2" Margin="200,0,0,0"/>
            </Grid>
        </StackPanel>
        <TextBlock x:Name="TextBlockTitle" HorizontalAlignment="Left" Margin="100,50,0,0" TextWrapping="Wrap" Text="Alp's Example App" VerticalAlignment="Top" Style="{StaticResource PageHeaderTextStyle}"/>
        <ComboBox x:Name="ComboBoxLanguage" HorizontalAlignment="Left" Margin="605,173,0,0" VerticalAlignment="Top" Width="250"/>
        <TextBlock x:Name="TextBlockLanguage" TextWrapping="Wrap" Text="Language:" HorizontalAlignment="Left" FontSize="15" VerticalAlignment="Top" Width="100" Margin="605,150,0,600"/>
        <Button x:Name="ButtonLocale" Content="System's Language" HorizontalAlignment="Left" Margin="605,210,0,0" VerticalAlignment="Top">
    </Grid>

In the next step, we will add the Resource files which we will use to store the translations for different languages. To do this in an orderly fashion, we’ll create a folder in our solution (I called it “Resources”), and then add a single resource file named “en” in it. (We’ll just fill the first resource file, then copy it for other languages and change its contents).


When you open this empty resource file, you’ll encounter the following:

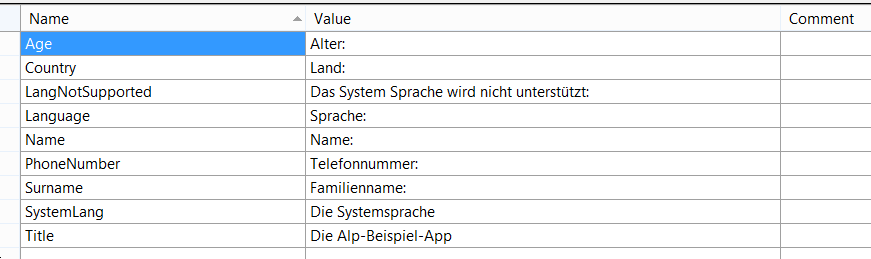
This is where we will be putting our translated strings. Name part is how we will access it (so this part will be the same in all our resource files), value is the translated string, and comment can be used for reminders such as how that particular string is used (for correct translations). We will then need to fill this resource file with the strings that we will translate. In our app, this will be the following: The strings in the form (name, surname, phone number etc.), the title of the app, the content of system language button, and the error message that we will display if the system language is not supported (we have to think of everything :)). This file will look like this when filled out for English:

Note the ‘:’ name, surname etc. (because they are in the forms).
Our english resource is complete. Now we will copy and paste this file, then change its name and contents for other languages. In this example I’m going to use 4 more languages: German (de), French (fr), Italian (it) and Turkish (tr). By the way, I made the following translations online, therefore it is quite likely that there are translation errors. 🙂

German resources.
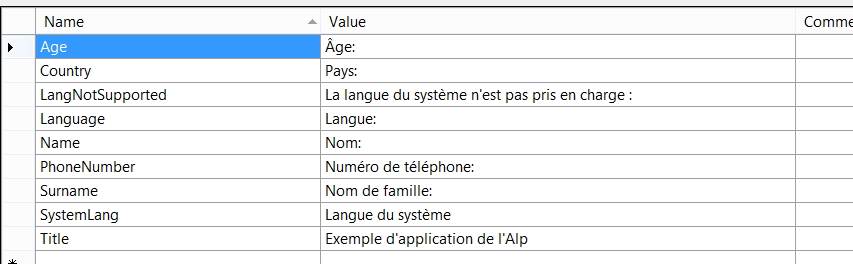
French resources.

Italian resources.
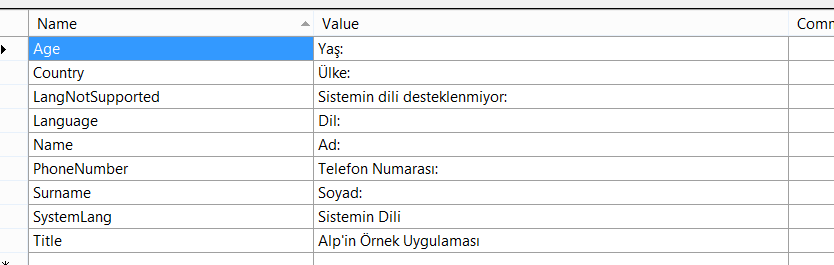
Turkish resources.
Ok then, our translations are ready. Now we need to use them in our app. We’ll begin with filling our combobox where we’ll select the language. For this purpose, I found it better to create a custom class called Language that has two members: DisplayName and LanguageCode. This way, we can display the name of the language to the users, but also reach its two letter code when we need. So we add the following code in our MainPage.xaml.cs and make the necessary bindings for the combobox in MainPage.xaml:
        private string currentLang = "en"; //default language is English

        public MainPage()
        {
            this.InitializeComponent();
            this.Loaded += MainPage_Loaded;
        }

        class AppLanguage
        {
            public string DisplayName { get; set; }
            public string LanguageCode { get; set; }
        }

        void MainPage_Loaded(object sender, RoutedEventArgs e)
        {
            List<AppLanguage> languageList = new List<AppLanguage>();
            languageList.Add(new AppLanguage() { DisplayName = "English", LanguageCode = "en"});
            languageList.Add(new AppLanguage() { DisplayName = "Français", LanguageCode = "fr" });
            languageList.Add(new AppLanguage() { DisplayName = "Deutsch", LanguageCode = "de" });
            languageList.Add(new AppLanguage() { DisplayName = "Italiano", LanguageCode = "it" });
            languageList.Add(new AppLanguage() { DisplayName = "Türkçe", LanguageCode = "tr" });
            ComboBoxLanguage.ItemsSource = languageList;
        }
<ComboBox x:Name="ComboBoxLanguage" HorizontalAlignment="Left" Margin="605,173,0,0" VerticalAlignment="Top" Width="250" DisplayMemberPath="DisplayName" SelectedValuePath="LanguageCode"/>
Then, we finally add the functionality where we reach to our resource files and change the strings depending on the language, in the SelectionChanged event of our combobox:
using Windows.ApplicationModel.Resources.Core;
        private void ComboBoxLanguage_SelectionChanged(object sender, SelectionChangedEventArgs e)
        {
            if (ComboBoxLanguage.SelectedItem != null)
            {
                currentLang = ComboBoxLanguage.SelectedValue.ToString();
                ResourceMap resourceMap = ResourceManager.Current.MainResourceMap.GetSubtree(currentLang);

                TextBlockAge.Text = resourceMap.GetValue("Age").ValueAsString;
                TextBlockCountry.Text = resourceMap.GetValue("Country").ValueAsString;
                TextBlockLanguage.Text = resourceMap.GetValue("Language").ValueAsString;
                TextBlockName.Text = resourceMap.GetValue("Name").ValueAsString;
                TextBlockPhoneNumber.Text = resourceMap.GetValue("PhoneNumber").ValueAsString;
                TextBlockSurname.Text = resourceMap.GetValue("Surname").ValueAsString;
                TextBlockTitle.Text = resourceMap.GetValue("Title").ValueAsString;
                ButtonLocale.Content = resourceMap.GetValue("SystemLang").ValueAsString;
            }
        }
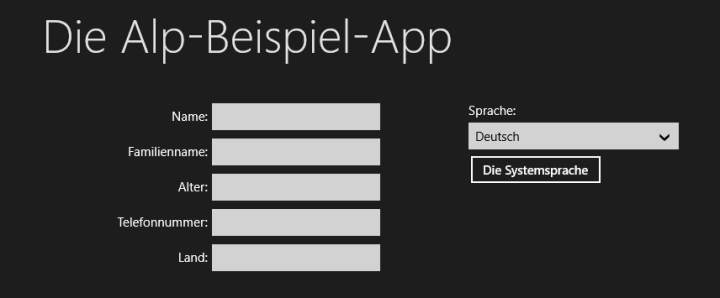
Here, we select the appropriate resource file based on the language code of the selected language in the combobox. If we run it now, and select different languages, we’ll see that the language of our app changes:


One final thing that we need to add is to detect the system’s language and change the application language to it if it is supported. For this example we’ll make it when we click our button, but in reality doing this automatically when our application starts would be more effective. We’ll do it by adding the following to the Clicked event of our button:
using Windows.UI.Popups;
        async private void ButtonLocale_Click(object sender, RoutedEventArgs e)
        {
            string systemLanguage = Windows.System.UserProfile.GlobalizationPreferences.Languages.ToList().First();
            ResourceMap resourceMap = ResourceManager.Current.MainResourceMap.GetSubtree(systemLanguage.Substring(0, 2));
            if (resourceMap != null)
            {
                currentLang = systemLanguage.Substring(0, 2);
                ComboBoxLanguage.SelectedValue = currentLang;
            }
            else
            {
                resourceMap = ResourceManager.Current.MainResourceMap.GetSubtree(currentLang);
                MessageDialog messageDialog = new MessageDialog(resourceMap.GetValue("LangNotSupported").ValueAsString + " " + systemLanguage);
                await messageDialog.ShowAsync();
            }
        }
In the first line of this code, we’ve taken a list of preferred languges and used the first one. This is actually the languages in the “Language” option in control panel (shown below). Also note that we’ve used the first two letters of the language, because the current language is given to us with the country if there are different variations (like en-US or en-UK).

This will return “en-US” in our app.

This will return “tr” in our app.
Our application is now complete. You can run the app and click “System’s language” button to detect the system language and change the app language to it if it is supported. You can also change your computer’s language from the control panel to see how it affects our app (or to see our “language not supported” messages”).
That’s it. 🙂 You can get the example’s source code here.
Thank you for reading and stay tuned for tomorrow’s boredom challenge article.
