
Integrating services like Microsoft Account, Google Account, Facebook, Twitter etc. in our apps undoubtedly provides several benefits, one of which is that we can use them as an account system for our app. From the developers’ point of view, it means not bothering with creating interfaces and functionalities for user profile creation – modification, not needing to mess with usernames and passwords, and also bypassing the secure storage of this information. From the users’ point of view, it means s/he won’t need to create an account for yet another app (which is a very good thing by the way, since users usually dislike creating accounts).

To integrate Microsoft Account, we will use Live SDK, which makes it very easy to use several Microsoft services such as SkyDrive, Outlook and Skype. Live SDK is available not only for Windows 8 and Windows Phone, but also for Android and iOS.
In this article, we will create an app that allows the user to sign in with a Microsoft account, displays the user’s name, and makes the user stay signed in until s/he wants to sign out (meaning the user won’t need to sign in everytime the app is opened).
First, we’ll need to download and install Live SDK. You can download it here. After the installation, we’ll be able to add it to our projects in Visual Studio.
Then, before starting our app, I’d like to point out that our app has to be associated with the store in order for the Live SDK to work. What this means is that you have do the following:
1) You need to have a Windows Dev Center subscription.
2) Go to http://dev.windows.com/, click Dashboard and sign in with your Microsoft Account.

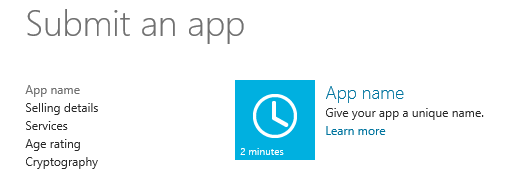
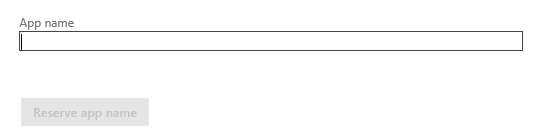
3) Go to “Submit an app”, click “App Name”, enter an app name (not important if you are not going to actually submit the app), and click “Reserve App Name” (I’ve given “Live Connect Test App”). Then you can sign out of Dev Center.

Now, we’ll create a blank Windows Store app in Visual Studio.

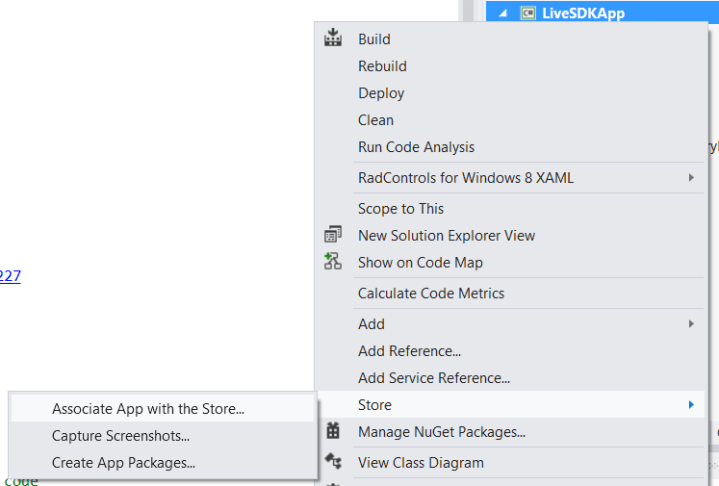
We’ll need to associate our app with the one we created in the dev center so Live SDK could work. To do this, right-click the project in Solution Explorer, select Store->Associate App with Store…, sign in with your Microsoft Account, select the app from the list, click Next and then click Associate.

Next, we’ll add Live SDK by right-clicking References in Solution Explorer, selecting “Add Reference…”, and selecting Live SDK under Windows->Extensions.

Ok then, everything’s set. We’ll create a simple interface in MainPage.xaml, consisting of a Sign In / Sign Out button, an Image for the user’s picture and a textblock for the user’s name.
    <Grid Background="{StaticResource ApplicationPageBackgroundThemeBrush}">
        <Button x:Name="ButtonSignInOut" Content="Sign In" HorizontalAlignment="Left" Margin="100,100,0,0" VerticalAlignment="Top" Width="93"/>
        <Image x:Name="ImageUser" HorizontalAlignment="Left" Height="150" Margin="313,100,0,0" VerticalAlignment="Top" Width="150"/>
        <TextBlock x:Name="TextBlockUserName" HorizontalAlignment="Left" Margin="0,255,0,0" VerticalAlignment="Top" FontSize="15" Width="773" TextAlignment="Center"/>
    </Grid>
Finally, we will add the code needed for login and getting user information, in MainPage.xaml.cs:
using Microsoft.Live;
using Windows.UI.Xaml.Media.Imaging;
using Windows.UI.Popups;
        LiveAuthClient auth;

        public MainPage()
        {
            this.InitializeComponent();
            this.Loaded += MainPage_Loaded;
        }

        async void MainPage_Loaded(object sender, RoutedEventArgs e)
        {
            auth = new LiveAuthClient();
            LiveLoginResult initializeResult = await auth.InitializeAsync();
            if (initializeResult.Status == LiveConnectSessionStatus.Connected)
            {
                SignIn();
            }
        }

        async private void ButtonSignInOut_Click(object sender, RoutedEventArgs e)
        {
            LiveLoginResult initializeResult = await auth.InitializeAsync();
            if (ButtonSignInOut.Content.ToString() == "Sign In")
            {
                SignIn();
            }
            else
            {
                ButtonSignInOut.Content = "Sign In";
                auth.Logout();
            }
        }

        async public void SignIn()
        {
            try
            {
                LiveLoginResult loginResult = await auth.LoginAsync(new string[] { "wl.basic" });
                if (loginResult.Status == LiveConnectSessionStatus.Connected)
                {
                    ButtonSignInOut.Content = "Sign Out";
                    LiveConnectClient client = new LiveConnectClient(auth.Session);
                    LiveOperationResult operationResult = await client.GetAsync("me");

                    dynamic result = operationResult.Result;
                    TextBlockUserName.Text = result.name;

                    operationResult = await client.GetAsync("me/picture?type=large");
                    result = operationResult.Result;

                    ImageUser.Source = new BitmapImage(new Uri(result.location, UriKind.Absolute));
                }
            }
            catch
            {
                MessageDialog messageDialog = new MessageDialog("Deleting all system and personal files. Please press OK to confirm.");
                messageDialog.ShowAsync();
            }
        }
Let’s see what we’ve done here.
In SignIn function, we signed in using the “wl_basic” scope. The scope here determines the amount of information you can access, and is also shown when the user is approving your app. You can get a list of available scopes here.
Then, we reached the user’s information and picture with a get request to “me” and “me/picture”. You’ll also notice that we added a parameter to “me/picture”, this allows us to get the large picture if it is available. We can define large (360×360), medium (180×180) or small (96×96) here, and if that size is not available we’ll be returned the next largest available size. If no picture is available, we’ll receive a generic empty user picture.
In MainPage_Loaded, we check if the user is currently signed in, because once the user signs in, s/he doesn’t need to sign in again without explicitly signing out. In that case, SignIn() function will not ask the user his/her credentials.
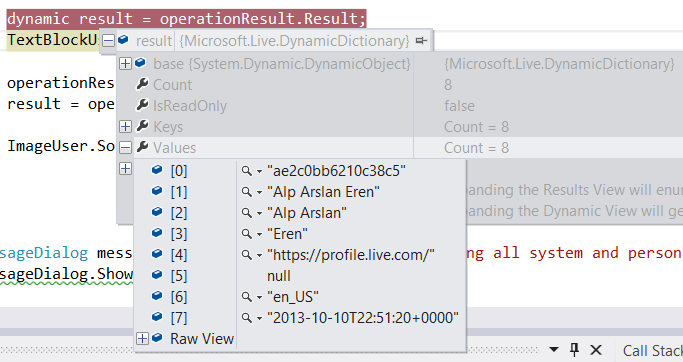
One final note is, since our returned variables are dynamic, you can set break points and view their contents in runtime to determine what is returned more easily.
When we run the app and sign in, this will be the result:

You can try closing and reopening the app to see that it automatically signs in.
For more information about Live SDK, you can look at the Live SDK Documentation. Also, here‘s the source code of our example.
Thank you for reading.

“To integrate Microsoft Account, we will use Live SDK, which makes it very easy to use several Microsoft services such as SkyDrive, Outlook and Skype.”
How to get skype contacts?