
In a software, user controls are the building blocks of the user interface. A user control is basically a piece of interface and code mixture that is designed for a specific action or purpose, and they provide the interaction between users and our app. They range from simple textblocks to more complex ones such as buttons, sliders, scrollbars, lists and grids, or to even more complex ones such as webviews, maps, pie charts or graphs. As developers, we can customize these user controls as much as they allow, like changing their texts, colors, sizes or even events (like what happens when we click a button or move a slider).
Another aspect of user controls is this: They are repeated a lot. Think what would happen if you wanted to put a button to your app but there weren’t any button controls. You would need to put a rectangle first, then a textblock in front of it, then set a click event, then arrange it’s animations for clicking and so on. Just for one button. Then if you wanted to put another button, you would need to copy all that you’ve prepared and paste it to the place you want, which would result in an absurdly big markup code composed completely of basic controls and a maintenance nightmare.
Ok then, now that we know what user controls are and why they’re nice, we’ll come to the custom user control part. Well, apart from default user controls, you can broaden the number of your user controls via adding other libraries (for Windows Store apps, like WinRT XAML Toolkit, Telerik RadControls for Windows 8 or Bing Maps control). However, you might still have a specific part of your interface (unique to your needs) that you need to repeat a lot. If this is the case, we can create a custom user control composed of other user controls that will make our work a lot easier.
Before going on to make an example app, I’d like to make it clear how custom controls are useful in Windows Store apps:
– They increase maintainability. If you want to change how it looks or works later, just make your changes to the custom user control, instead of not using a user control and changing it in every place you’ve used.
– Combined with data binding, they can be very powerful and dynamic.
– Especially useful in places where you don’t have a codebehind file, such as the item templates for gridviews or listviews. Without them, you will not be able to easily put buttons or other interactive user controls in your item template.
Alright alright, enough ranting, let’s create an example app. 🙂 We’ll now create a Windows Store app which will have a custom user control in a GridView item template. It will be a mockup app, where we will show the user his/her incoming friendship requests and the user will either accept or ignore them. 🙂
We start by creating a blank Windows Store app in Visual Studio.

First, we’ll create our friendship request class. Right click the project in Solution Explorer, select Add->Class…, name it FriendshipRequest.cs and add members to it like shown below:
namespace CustomUserControlApp
{
    public class FriendshipRequest
    {
        public string UserName { get; set; }
        public string UserMessage { get; set; }
        public string UserGender { get; set; }
        public int UserAge { get; set; }
        public string UserJob { get; set; }
        public string UserImage { get; set; }
    }
}
Next, we will create our custom user control. Right click the project, select Add->New Item… and add a User Control named “FriendshipRequestUserControl.xaml” (<rant>Yes, the name is long but being long and understandable is better than being short and incomprehensible. If you prefer the latter, name it “c.xaml” and forget what it was after 2 days.</rant>).

Now we need to create the interface of our user control, so in FriendshipRequestUserControl.xaml put the following XAML code (notice that I’ve made the data bindings and created the events right now for simplicity):
    <Grid x:Name="GridRoot" Background="#FF869ADD" Height="265" Width="500">
        <Image HorizontalAlignment="Left" Height="160" Margin="10,10,0,0" VerticalAlignment="Top" Width="160" Stretch="UniformToFill" Source="{Binding UserImage}"/>
        <StackPanel x:Name="StackPanelUserInfo" Margin="175,10,0,10">
            <TextBlock FontSize="16" FontFamily="Segoe UI" Text="{Binding UserName}"/>
            <TextBlock FontSize="16" FontFamily="Segoe UI" Text="wants to be your friend!" Margin="0,2,0,0"/>
            <TextBlock x:Name="TextBlockAge" FontSize="16" FontFamily="Segoe UI" Margin="0,5,0,0"/>
            <TextBlock FontSize="16" FontFamily="Segoe UI" Margin="0,2,0,0" Text="{Binding UserGender}"/>
            <TextBlock FontSize="16" FontFamily="Segoe UI" Margin="0,2,0,0" Text="{Binding UserJob}"/>
            <TextBlock x:Name="TextBlockUserSays" FontSize="16" FontFamily="Segoe UI" Margin="0,5,0,0"/>
            <TextBlock x:Name="TextBlockUserMessage" FontSize="16" FontFamily="Segoe UI" Margin="0,2,0,0" TextWrapping="Wrap" Height="95" TextTrimming="WordEllipsis"/>
        </StackPanel>
        <Button x:Name="ButtonAccept" Content="Accept" HorizontalAlignment="Left" Margin="10,175,0,0" VerticalAlignment="Top" Width="160" Click="ButtonAccept_Click"/>
        <Button x:Name="ButtonIgnore" Content="Ignore" HorizontalAlignment="Left" Margin="10,218,0,0" VerticalAlignment="Top" Width="160" Click="ButtonIgnore_Click"/>
        <ProgressRing x:Name="ProgressRing" Margin="48,175,372,10" Height="80" Width="80" Foreground="White"/>
        <TextBlock x:Name="TextBlockRequestAccepted" FontSize="16" FontFamily="Segoe UI" Margin="10,175,0,0" HorizontalAlignment="Left" Width="160" Height="80" VerticalAlignment="Top" TextWrapping="Wrap" Visibility="Collapsed"/>
    </Grid>
Next, we will fill the codebehind of our user control. You may have noticed that some of the textblocks are data binded but some are not (those that are given a name), because we will set them in the code (we’ll format their strings a little, also this is a good way to show how we can reach the binded object from inside the user control). We also have a progress ring to simulate the time passing while accepting. This is how we will fill our FriendshipRequestUserControl.xaml.cs file:
using Windows.UI.Popups;
    public sealed partial class FriendshipRequestUserControl : UserControl
    {
        public event EventHandler Ignored;

        public FriendshipRequestUserControl()
        {
            this.InitializeComponent();
            this.Loaded += FriendshipRequestUserControl_Loaded;
        }

        async void FriendshipRequestUserControl_Loaded(object sender, RoutedEventArgs e)
        {
            this.Ignored += MainPage.MainPage_UserIgnored;
            FriendshipRequest friendshipRequest = this.DataContext as FriendshipRequest;
            if (friendshipRequest != null)
            {
                if (friendshipRequest.UserAge != 1)
                {
                    TextBlockAge.Text = friendshipRequest.UserAge + " years old";
                }
                else
                {
                    TextBlockAge.Text = friendshipRequest + " year old";
                }
                TextBlockUserSays.Text = friendshipRequest.UserName + " says:";
                TextBlockUserMessage.Text = "\"" + friendshipRequest.UserMessage + "\"";
            }
            else
            {
                MessageDialog messageDialog = new MessageDialog("You have been caught while trying to hack into the CIA database. Authorities have been notified, please stay where you are.");
                await messageDialog.ShowAsync();
                ButtonAccept.Visibility = Visibility.Collapsed;
                ButtonIgnore.Visibility = Visibility.Collapsed;
                this.Ignored(this, null);
            }
        }

        private void ButtonAccept_Click(object sender, RoutedEventArgs e)
        {
            DispatcherTimer timer = new DispatcherTimer();
            timer.Interval = new TimeSpan(0, 0, 2);
            timer.Tick += timer_Tick;
            ButtonAccept.Visibility = Visibility.Collapsed;
            ButtonIgnore.Visibility = Visibility.Collapsed;
            ProgressRing.IsActive = true;
            timer.Start();
        }

        void timer_Tick(object sender, object e)
        {
            ProgressRing.IsActive = false;
            TextBlockRequestAccepted.Text = "You are now friends with " + (this.DataContext as FriendshipRequest).UserName + "!";
            TextBlockRequestAccepted.Visibility = Visibility.Visible;
        }

        private void ButtonIgnore_Click(object sender, RoutedEventArgs e)
        {
            this.Ignored(this, new EventArgs());
        }
    }
Here, in FriendshipRequestUserControl_Loaded function, we first attach an event handler in MainPage.xaml (we’ll add it at the next step) to our Ignored event, then get the binded object and fill the necessary parts with its information. Accept button starts a timer (that simulates us accepting the request), and ignore button invokes the Ignored event handler which we’ll use to remove the ignored person from the list. Also, if we can not convert the binded object to a FriendshipRequest (if it is null), we handle it by calling the Ignored event and removing the erroneous request (we can determine in MainPage.xaml that this is removed because of an error from the fact that we are sending it with a null EventArgs object).
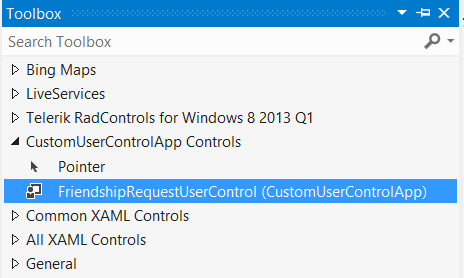
Next, we will put a GridView in MainPage.xaml, and create an item template for it that contains only one FriendshipRequestUserControl. At this point, you can see our custom user control in the toolbox in Visual Studio (after you build the project, of course).
In MainPage.xaml:
    <Grid Background="{StaticResource ApplicationPageBackgroundThemeBrush}">
        <GridView x:Name="GridViewFriendshipRequests" Margin="100,100,0,50" ItemTemplate="{StaticResource DataTemplateGridViewFriendshipRequests}"/>
    </Grid>
In App.xaml:
            <DataTemplate x:Key="DataTemplateGridViewFriendshipRequests">
                <local:FriendshipRequestUserControl />
            </DataTemplate>
Finally we just need to add the following code in MainPage.xaml.cs, where we will create some example friendship requests and set them as the item source for the GridView. We’ll also add a UserIgnored event handler to remove the ignored requests.
using System.Collections.ObjectModel;
ObservableCollection<FriendshipRequest> friendshipRequestList = new ObservableCollection<FriendshipRequest>();
public MainPage()
{
this.InitializeComponent();
this.Loaded += MainPage_Loaded;
}
void MainPage_Loaded(object sender, RoutedEventArgs e)
{
friendshipRequestList = new ObservableCollection<FriendshipRequest>();
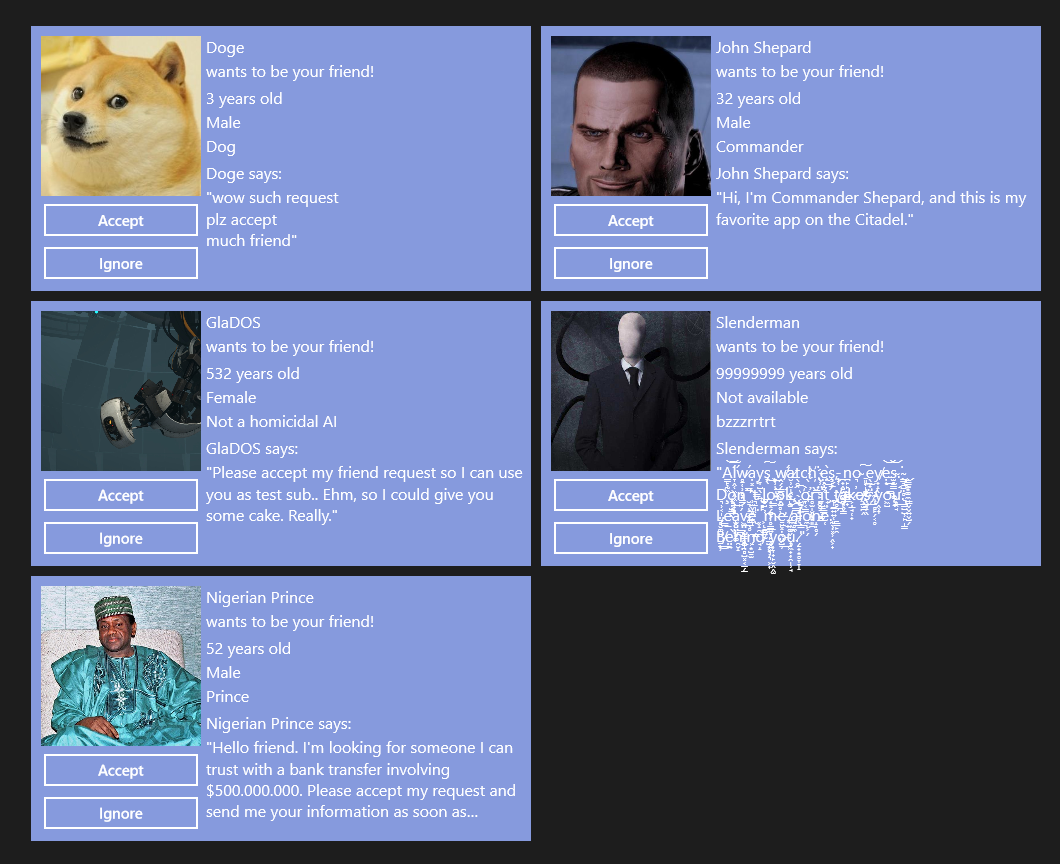
friendshipRequestList.Add(new FriendshipRequest() { UserName = "Doge", UserAge = 3, UserGender = "Male", UserJob = "Dog", UserMessage = "wow such request\nplz accept\nmuch friend", UserImage = "http://discoverygc.com/wiki/images/thumb/3/34/Doge_(1).jpg/264px-Doge_(1).jpg" });
friendshipRequestList.Add(new FriendshipRequest() { UserName = "GlaDOS", UserAge = 532, UserGender = "Female", UserJob = "Not a homicidal AI", UserMessage = "Please accept my friend request so I can use you as test sub.. Ehm, so I could give you some cake. Really.", UserImage = "http://images.wikia.com/half-life/en/images/4/4d/Glados_new_body.jpg" });
friendshipRequestList.Add(new FriendshipRequest() { UserName = "Nigerian Prince", UserAge = 52, UserGender = "Male", UserJob = "Prince", UserMessage = "Hello friend. I'm looking for someone I can trust with a bank transfer involving $500.000.000. Please accept my request and send me your information as soon as possible.", UserImage = "http://ethicsalarms.files.wordpress.com/2011/03/nigerian-prince.jpg" });
friendshipRequestList.Add(new FriendshipRequest() { UserName = "John Shepard", UserAge = 32, UserGender = "Male", UserJob = "Commander", UserMessage = "Hi, I'm Commander Shepard, and this is my favorite app on the Citadel.", UserImage = "http://images4.wikia.nocookie.net/__cb20120213040953/knowyourmeme/images/thumb/2/20/Commander_Shepard.jpg/398px-Commander_Shepard.jpg" });
friendshipRequestList.Add(new FriendshipRequest() { UserName = "Slenderman", UserAge = 99999999, UserGender = "Not available", UserJob = "bzzzrrtrt", UserMessage = "Á̳̙̰͖͝ĺ̞̭̜͖̭͖̩̝̻͠ẃ̷̥̠̜̹̻͙̳̩a͏̦͓͇̭y̨̞̺̖͇͍s̨̠̖͠ ̧͖̹̠͍̦͇͟ͅͅẃ̸̭̗̗̳͖̖̭̫a̷̶̮̹̮̩̯̟̲t̖̯͉c҉̖h̢̖̹̤͇̥̙̻̬͘è̢̤̭̣̠͕ş͉̲ͅ,̵̧͎̜ ̪̟̭̱̗̤̟̥ͅn̪̙̙͍̳̲̳̟o̴͉ ̠͈̦̩͚̞̝̺̯͠e̖̼̟̤̪̟y̸̟̝̖e̶̦͢͝ͅs̴̫̥̳͇͚͎̘͝ͅ.͏̴̳͉̺̣̥͘ ͕̳̫͙͚̼͍͜\nḐ͉̹͔̩̤͔͔̕o̧̖̦̺̲̲̖͢n̮͉̠͕̗͚̖̥͘ͅ'̹̫̬͙̲̲͙̞t͉̠̩̜ ̢̘̻̙ļ̶̡͎̺o͎͓̗͚̗ó̦̫̥̹k͚ͅ,҉̢̣͎͇͙̺̠̜ ̮̫̘͖͡o̶̞͔̳̕r̥̫̩̮̬͙͈̪̀̕ ̭͉ͅí̞̺̳͕͚t̡͔͎͇́͝ ̢҉̯̩̪͍͍̜͈t̸̢̢̯̥ą̼̘̬̳k̷̕͏͕̣̲̘̜̟e̸̷҉̖̲̫̪̭ș̬̝̖͟͠ ̸͏̴̩̱̻̙̗͔̥y̭̹̞o͖̺͠ư͙̯̘͟.͉̳̺̺̹̙̩̳͡ ̳̬̬͍̬̺̗\nL̨̥̮͚͍e͇̲̕̕á̧̫̤̠̤̤̥͚͝v̴͖̤͇̟̳̥͔̤͟e̢͓̝̯͇͘ ͕͍̳̕ͅm̴̥̳͍͉̙͕͍̫̩e̵̛̠̮͓̦̖̤̗ ̶̸̙͖͚̬̣ą̼̥̼́͡l̳͟͟ͅơ̴̼͕̗ͅn̶̴̝̣̥̗e̜.̰̖̣͓̹̭͕̟ ̠̳̙̯́͞\nḆ̸̩̹͟͜è̤͍h̡̛̯̮̝i̢̛͚̝̻̺͓͔̲̗̲n̨̛͕͙̺̠̫d̸̴̘̝ ̶̺͎̟̹͉͕͎͞y̹̞̟̙̮̭̭̫o̵̺̹͟͠ù̧̞͖̟͎̯̩̹̘.̷̗̠̟͙̥̞̞̝", UserImage = "http://d38zt8ehae1tnt.cloudfront.net/Slenderman__109647.jpg" });
GridViewFriendshipRequests.ItemsSource = friendshipRequestList;
}
public static void MainPage_UserIgnored(object sender, EventArgs e)
{
FriendshipRequestUserControl friendshipRequestUserControl = sender as FriendshipRequestUserControl;
FriendshipRequest friendshipRequest = friendshipRequestUserControl.DataContext as FriendshipRequest;
((Window.Current.Content as Frame).Content as MainPage).RemoveRequest(friendshipRequest);
}
private void RemoveRequest(FriendshipRequest friendshipRequest)
{
friendshipRequestList.Remove(friendshipRequest);
}
Note that we’ve gone through a seemingly ridicilous way of reaching our ObservableCollection and removing the item. This is because we can’t directly reach the current instance of MainPage from our FriendshipRequestUserControl; we have to get the current Frame from Window.Current, and then get the MainPage from that Frame to reach our list.
Aaand our application is complete. If we run it now, we’ll see the following:
And after accepting our little buddy Doge and ignoring our spammy Nigerian friend, it will look like this:

That’s it. 🙂 I hope you’ve enjoyed reading as much as I’ve enjoyed writing. 😀
Here‘s the link to the source code.
By the way, Slenderman looks quite creepy. 😀 The text style we used in that message is called Zalgo text, look it up, it’s fun. 🙂
See you at my next article.
